RGB compositing
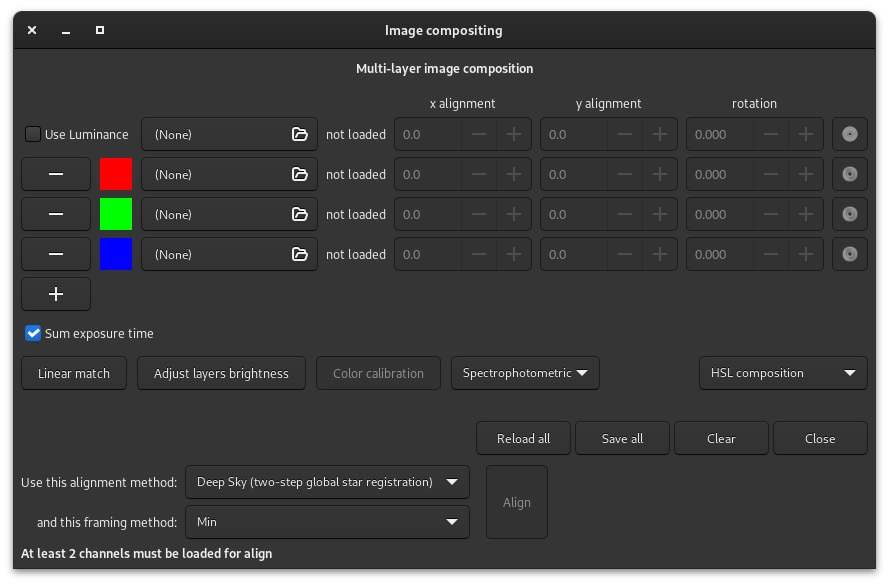
The RGB composition tool allows you to assemble up to 8 monochrome images to form a single color image. The tool has been updated to provide access to all the best registration methods available in Siril, plus a manual registration method unique to this tool.
The operation of this tool is quite simple, just load the images and assign them a color. The first field, optional, is reserved for the luminance layer. Once a luminance layer is loaded you can integrate it or not in the composition thanks to the Use Luminance button. Each color can be customized by clicking on it and choosing a new one. When more than 3 images (or 4 if there is luminance) are loaded, or when the assigned colors are color mixtures rather than pure R, G and B, it may be necessary to adjust the brightness of each channel. The Adjust layers brightness button performs this operation automatically.
When compositing different channels, especially from narrowband filters, the histograms may be severely mismatched. A basic initial correction can be made by applying a linear match using the Linear match button. This works in the same way as the Image Processing menu entry, but is tailored to this particular tool. The top layer loaded (usually Luminance or Red) is taken as the reference channel, and all other channels are automatically linearly matched to it. This is particularly important if assigning non-pure colours to some layers, as each layer will potentially be blended into each RGB channel in the result, and it will no longer be possible to separately adjust the histograms of the input layers by adjusting the R, G and B histograms of the composition.
It is possible enable or not the Sum exposure time. This option gives the user the option of summing or not the exposures of individual images, storing the result in the FITS header.
Note
For binning and image dimensions, the first loaded image determines the size of the output image. If you have images of different sizes, you should always load the largest first. If your images are different just because of binning, so with the same field of view, the composition tool will upscale the smaller images when they are loaded to match the size of the first loaded image. It is useful for the common L-RGB taken with the colour filters in bin 2. This also means that if two images have not been taken with the same sensor, it is unlikely they will have the same field of view and pixel sampling after image resampling. Whether or not this tool can align such images will depend on the scale mismatch and the alignment method used.
Three color spaces are available for rendering the composition:
HSL (for hue, saturation, lightness)
HSV (for hue, saturation, value; also known as HSB, for hue, saturation, brightness)
and are left to the choice of the user.
Once the composition is finished, it is possible to do a linear match of the channels using the Linear match button.
If the images are not aligned with each other, then it is possible to align them. The following algorithms are possible:
Deep Sky (two step global star registration): no selection is required for this method. This generates a very accurate 8 degrees-of-freedom homography mapping between images.
Planetary (DFT pattern alignment): you have to draw a selection around the object you want to align. A high enough contrast is required for the algorithm to work properly. This method only registers image shifts, it cannot compensate for rotation. This is fine for planetary images but for deep sky images it is recommended to use the global star registration method.
KOMBAT: as with the DFT pattern matching, you have to draw a selection around the object you want to align. This method also only registers image shifts. It is much faster than the DFT method, but can be less successful when the image patterns in the different channels are significantly different (for example, two planetary channels filtered with IR and UV filters may not share enough pattern similarity for KOMBAT to match them).
Manual alignment: this method is unique to the RGB composition tool. When selected, the spin buttons change function from displaying information about alignment shifts to allowing you to enter desired shifts in x and y as well as rotation. Rotation defaults to centering on the image center, but a custom rotation center may be chosen for each layer using the centermark button at the right of each set of layer controls. This method may be of use if you have imagery that is not suited to alignment using any of the other methods, or if you wish to fine tune results.
You can choose the framing method that will be applied to your aligned layers. The following methods are possible:
First channel - this method frames all other frames to the first channel (usually Luminance or Red). This makes particular sense for LRGB compositions.
MIN - this method applies the minimum framing: the largest rectangle including only regions that are covered by all the input images will be framed.
COG - this method selects an optimum framing for the composition based on the centre of gravity of the aligned image pixels.
Note
Framing methods do not apply to DFT shift alignment. This method always frames based on the first layer. If this alignment method is selected, the chosen framing method will be ignored.
Tip
On alignment the RGB composition tool aligns the loaded images in memory. That means that if you decide you aren't happy with the alignment and want to try a different method or a different framing, you have to reload all the images to get back to their original state before alignment. The Reload all button is provided for this purpose.
If you prefer to composite your images in a different way, for example using Pixel Math, you can still use the RGB composition tool as a quick means of aligning the images. After alignment, pressing Save all will save all the aligned images with their original filenames prefixed with comp_. These can then be brought into whatever tool you like and, unlike if you create a sequence with your stacks and align it in the normal way, it is obvious from the filename which image is which.
This tool is by nature graphical and is not exactly replicated in a Siril command, however there are commands that can be used to achieve part of the process:
Registration can align a sequence containing your stacked images,
The rgbcomp command can compose a RGB image from 3 separate R, G and B images or 4 L, R, G, B images, however the images must be pre-aligned and it cannot assign mixed colors to the input images.
Pixelmath can also be used in scripts to combine channels.
There is also a built-in RGB Composition script that can partly automate the process.
Siril command line
rgbcomp red green blue [-out=result_filename] [-nosum]
rgbcomp -lum=image { rgb_image | red green blue } [-out=result_filename] [-nosum]