Registration
Registration is basically the process of aligning the images from a sequence to be able to process them afterwards. All the processes described hereafter calculate the transformation to be applied to each image in order to be aligned with the reference image of the sequence.
Siril's strength lies in the wide variety of recording algorithms offered. Each method is explained below. Pressing the Go register button starts the registration of the sequence.
It is possible to choose the registration channel. Green is the default for color images, Luminance for monochrome. The (*) sign appearing after the channel's name means that registration data is already available for this layer. When processing images, registration data is taken from the default layer if available (for RGB images: Green, else fallback to Blue then Red).
Theory
Registration process
What we call Registration is in fact a three-step process:
Detect features to be matched in all the images
Compute the transformations between each image and the reference image
Apply the computed transformation to each image to obtain new images
Depending on the registration method selected, the 3 steps occur (or not) into a single process. Siril uses the most sensible defaults (choosing whether or not to apply the computed transformation) depending on the registration method selected, but understanding the internal machinery may help you to change this behavior to better suit your needs.
Algorithms
The table here below details the different algorithms used for the first 2 steps (detection and transformation calculation).
Registration method |
Feature detection |
Transformation calculation |
Shift |
Euclidean |
Similarity |
Affine |
Homography |
Spherical |
Undistort |
|---|---|---|---|---|---|---|---|---|---|
Global |
Triangles matching + RANSAC |
subpixel |
x |
x |
x |
x |
x |
||
2 pass |
subpixel |
x |
x |
x |
x |
x |
|||
1-2-3 stars |
PSF minimization in selection box |
Singular Value Decomposition (2-3 stars) Difference (1 star) |
subpixel (1 star) |
(2-3 stars) |
|||||
Image Pattern alignment |
cross correlation on selection box |
pixel |
|||||||
KOMBAT |
Max of convolution in spatial domain on selection box |
pixel |
|||||||
Comet |
PSF minimization in selection box |
Shifts from velocity vector using timestamps |
subpixel |
||||||
Manual |
Your eyes |
Your hand |
pixel |
||||||
Astrometry |
. From astrometric solution |
subpixel |
x |
x |
x |
||||
It is also important to keep in mind how the registered sequence is fed into the stacking process that is generally used right after registration:
if the transformation consists only of pixel-wise shifts, the stacking algorithm can use these shifts on-the-fly when reading the images. It means you do not need to generate "registered images". This saves storage space and skips interpolation. It is, of course, at the expense of less accurate registration (i.e. subpixel accuracy) but is generally used on planetary/lucky imaging images where sampling is small. This can also be applied with a registration method which computes subpixel shifts. During the stacking process, the shifts will be rounded off to pixel precision. In any other case, meaning the stacking is fed with a sequence where the registration has computed transformations more complex than just shifts but the registered images have not been saved, Siril will emit a warning inviting you to export the registered images before proceeding to stacking.
In all other cases, once the transformations have been computed, the transformed images need to be saved before proceeding to stacking, generally named with
r_prefix.
Image transformations
Siril uses linear transformations, with different degrees-of-freedoms, to map an image to the reference image:
Shift is a 2 degree-of-freedom (x/y shifts) rigid mapping, well-suited for images with no distortion, no scaling and no field rotation. It needs only 1 pair of stars (or feature) to be matched to define the transformation.
Euclidean is a 3 degree-of-freedom (x/y shifts + one rotation) rigid mapping, for images with no distortion, no scaling. It needs at least 2 pairs of stars to be matched to define the transformation.
Similarity is a 4 degree-of-freedom (one scale, one rotation and x/y shifts) more rigid mapping than homography, well-suited for images with no distortion. It needs at least 2 pairs of stars to be matched to define the transformation.
Affine is a 6 degree-of-freedom (two scales, one shear, one rotation and x/y shifts) more rigid mapping than homography, well-suited for images with little distortion. It needs at least 3 pairs of stars to be matched to define the transformation.
Homography is the default transformation which uses an 8-degree-of-freedom transform to warp the images onto the reference frame. This is well-suited for the general case and strongly recommended for wide-field images. It needs at least 4 pairs of stars to be matched to define the transformation.
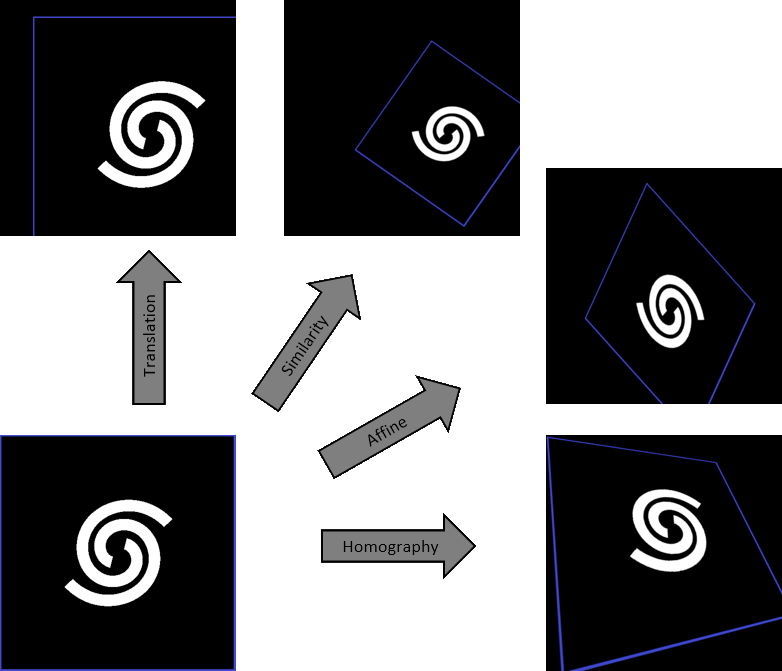
When using Astrometric registration, introduced in version 1.3, Siril can also transform images using spherical (gnomonic) projection, which is non-linear. This mode is useful when assembling multiple panels from a mosaic which cover an extended field of view, as it will enable the tiles away from the center to coincide. For small fields of view, the planar (homographic) projection will be sufficient and also a bit faster to compute.
Reference image
This is the image which is used as a common reference to compute the transformations that send all the images of the sequence onto this particular one.
If not set manually, the reference image is chosen with the following criteria:
if the sequence has already been registered, it is the best image, in term of lowest FWHM or highest quality depending on the type of registration
Otherwise, it is the first image of the sequence that is not excluded.
To specify an image as the reference, you can:
Open the Frame selector, select the image to be set as the new reference and click the button Reference Image.
Use the command setref. For instance, if you want to set image #10 as the reference:
setref 10
Siril command line
setref sequencename image_number
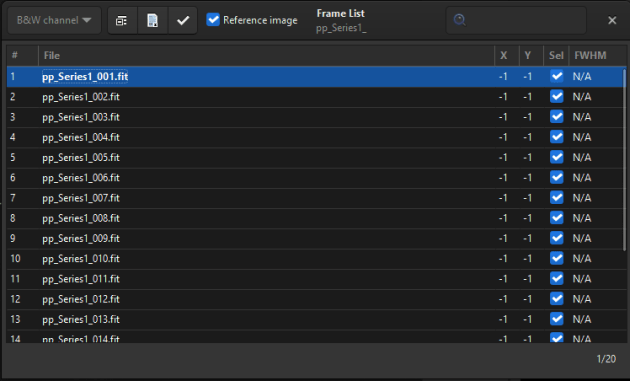
The frame list dialog. You can browse all images in the sequence.
During stacking, the reference image is used as the normalization reference as well, if normalization is activated.
Registration methods
Global registration
This is probably the more powerful and accurate algorithm to align deep-sky images.
The global matching is based on triangle similarity method for automatically identify common stars in each image [Valdes1995]. Our implementation is based upon the program match from Michael Richmond. Then, RANSAC [Fischler1981] algorithm is used on the star lists to further reject outliers and determine the projection matrix. The robustness of the algorithm depends on the ability to detect the stars while avoiding false detections. Siril has a very elaborate star detection algorithm that avoids as much as possible to select objects that are not stars in the fastest possible time. The detection of the brightest stars is usually the most important. However, if there is a need to detect fainter stars, then the Dynamic PSF window can be used to adjust the detection parameters.
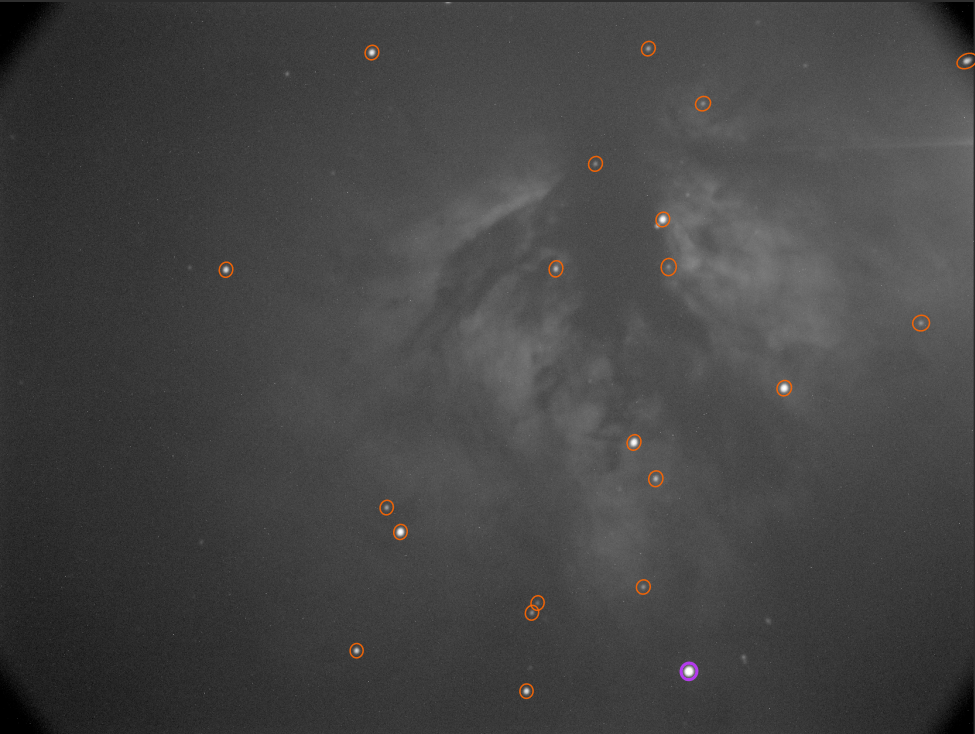
Automatic detection of stars in a single frame
There are few options associated with this alignment method because it is fairly automatic.
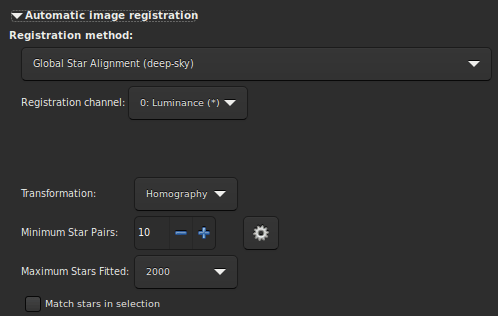
The Transformation dropdown menu allows to choose between different transformations.
Warning
The initial star matching uses triangle similarity algorithm, in consequence the minimum of star pairs must be at least of 3 for Shift, Similarity and Affine and of 4 for Homography.
Other options are:
The Minimum Star Pairs button sets the minimum number of star pairs a given frame can have in relation with the reference frame. If a given light frame has less star pairs, it will not be registered. To the right of this option is a button that opens the PSF Dynamique tool.
The option Maximum Stars Fitted defines the maximum number of stars to be searched for in each frame (default 2000). The larger this value, the more stars will potentially be detected, resulting in a longer detection but more accurate registration.
Finally, the last option, Match stars in selection, if you want to perform the Global Star Alignment algorithm within the selected area in the reference image. If no selection are done, this option is ignored.
Siril command line
register sequencename [-2pass] [-noout] [-upscale] [-prefix=] [-minpairs=] [-transf=] [-layer=] [-maxstars=] [-nostarlist] [-interp=] [-noclamp] [-selected]
2pass registration
The global star alignment is done in two passes, allowing the reference frame
to be chosen from detected star information instead of automatically choosing
the first frame of the sequence. The proposed options are similar to the
Global Registation
algorithm but this method does not create any sequences and all alignment
information is saved in the seq file.
During star detection, Siril sets a maximum of 2000 stars to be found (this can also be changed with the appropriate option). In case more than one image has reached the maximum star limits, the star lists of all images are screened again. A new minimum detection threshold is defined to be able sort the images by both number of stars detected and FWHM.
Unless specified otherwise, the star lists of all images are saved when using this
method, the .fit(s) extension being replaced by .lst. This allows to re-run
the 2pass algorithm very quickly with different parameters, say different
transformation. In case the star detection have been modified, the process detects
these changes and re-run the analysis as required.
This registration must generally followed by Apply Existing Registation in order to apply the
transformation and build a new sequence, unless you have chosen to compute
Shift.
These lines perform a 2pass registration on a sequence named pp_light and applies it. The output is a sequence pp_light.
# Align lights in 2 passes
register pp_light -2pass
seqapplyreg pp_light
These lines perform a 2pass registration on a sequence named colors and applies it while cropping the output images to the minimum coommon area. The output is a sequence pp_colors. This can be useful before compositing mono images (the areas which are not common to all images are cropped).
# Align layers in 2 passes and crop away borders
register colors -2pass
seqapplyreg colors -framing=min
1-2-3 stars registration
When the images contain few stars, for example in the case of DSO Lucky Imaging images where the frame exposure is less than one second. It is possible that the global registration algorithm fails, even if you change the detection parameters in the Dynamic PSF window. It may then be interesting to make a manual detection of the stars you want to align. This is the interest of the 1, 2 or 3 star registration algorithm.
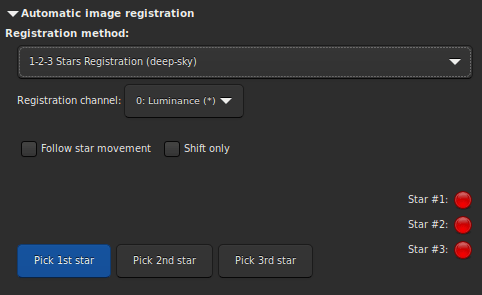
The principle of this method is to draw a selection area around a star and click on the Pick 1st star button, then so on.
If only one star is selected, only the translation between the images will be calculated. Therefore the Shift only button is automatically selected. The shift values are then storred in the
seqfile.If two or three stars are selected, then the rotation can be calculated and applied to create a new sequence. However, if the Shift only option is selected, which is not mandatory, only the shifts will be calculated.
The option Follow star movement use the position of the star(s) found in the previous image as new centre for the current image registration. This allows the selection area to be smaller, registration faster, and accounts for drift or images with a large number of stars.
Warning
Enabling this option requires the registration to not be parallelized, it will run on one CPU core only.
Image Pattern alignment (planetary-full disk)
This is a simple registration by translation method using cross correlation in the spatial domain.
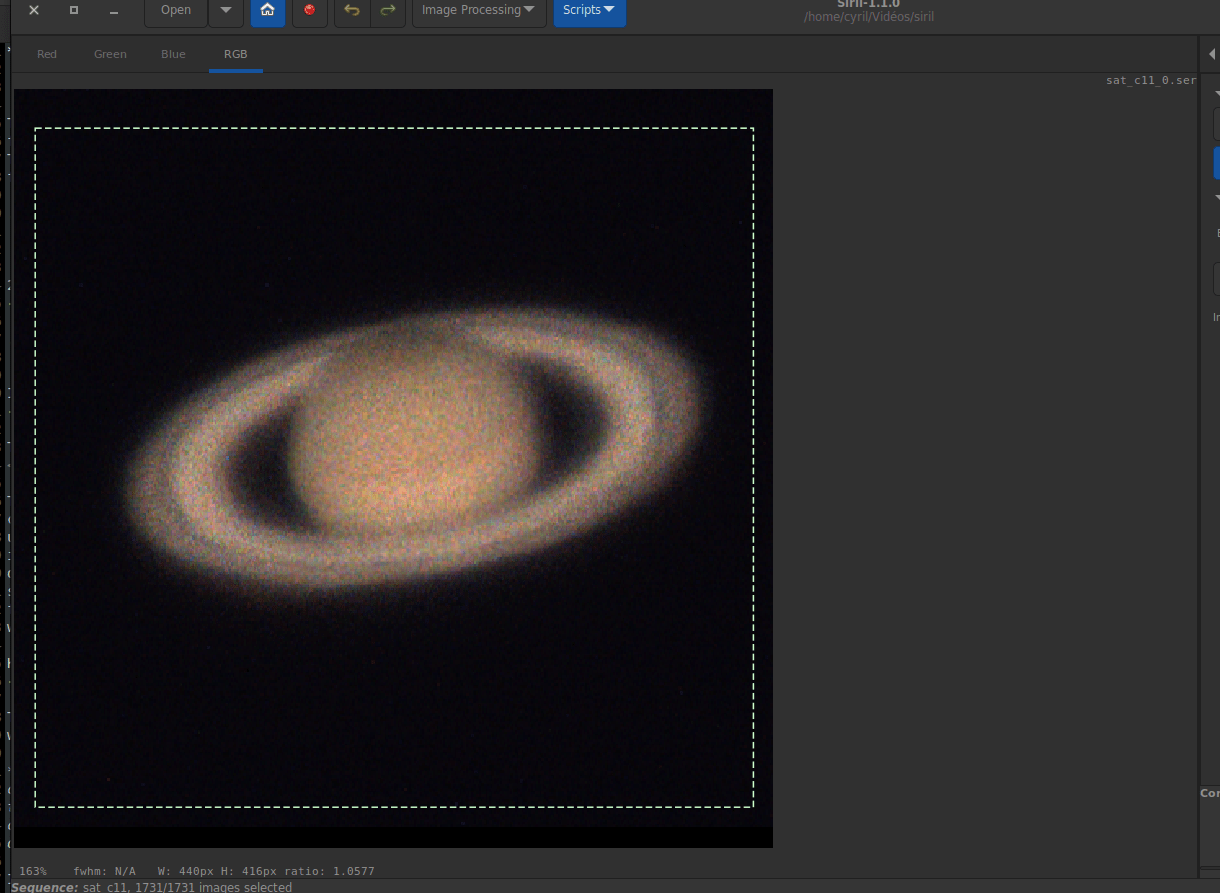
This method is fast and is used to register planetary movies, in which constrasted information can be seen on large areas of the image. It can also be used for some deep-sky images registration. Nevertheless keep in mind that it is a single point alignment method, which makes it poorly suited for high definition planetary alignment. But, it does effectively anchor the images to stabilize the sequence. Simply draw a selection around the object (the planet for example) and make sure that its movement during the sequence is contained within the selection. Only the translation can be calculated with this method.
KOMBAT
This method comes from the OpenCV library, a library widely used in Siril. They explain:
It simply slides the template image over the input image (as in 2D convolution) and compares the template and patch of input image under the template image. Several comparison methods are implemented in OpenCV. (You can check docs for more details). It returns a grayscale image, where each pixel denotes how much does the neighbourhood of that pixel match with template.
In practice, simply draw a selection around the object (the planet for example) and make sure that its movement during the sequence is contained within the selection. Only the translation can be calculated with this method.
Comet/Asteroid registration
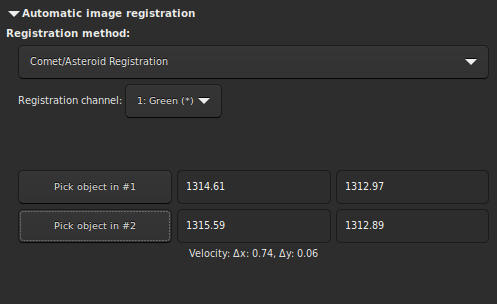
The cometary registration tool works in a very simple way, in two steps.
With the frame selector, select the first image of the sequence, surround the comet nucleus, then click on the button Pick object in #1.
Then select the last image of the sequence, surround the nucleus of the comet, then click on the button Pick object in #2.
The comet velocity \(\Delta x\) and \(\Delta y\) is computed in pixel per hour if everything is ok.
Warning
The alignment of the comet must be done on images whose stars have been
previously aligned. Either via a new sequence, with the global alignment,
or by having saved the registration information in the seq file. In
this last case, the option Accumulate reg. data (explained
below) makes sense.
Note
To fully function, the images must have a timestamp. Only FITS, SER and TIFF images are compatible with this feature.
Manual Registration
This last method of registration is very particular, which explains its separate position, and allows to align images manually. Of course, only the translation between images is allowed.
The first thing to do is to define two previews in the image. Clicking on the button Set first preview will initialize the first preview. You then need to click on an area of the image, ideally a star in the vicinity of an edge of the image to set the preview area. A click on the second button Set second preview allows to do the same on a second point.
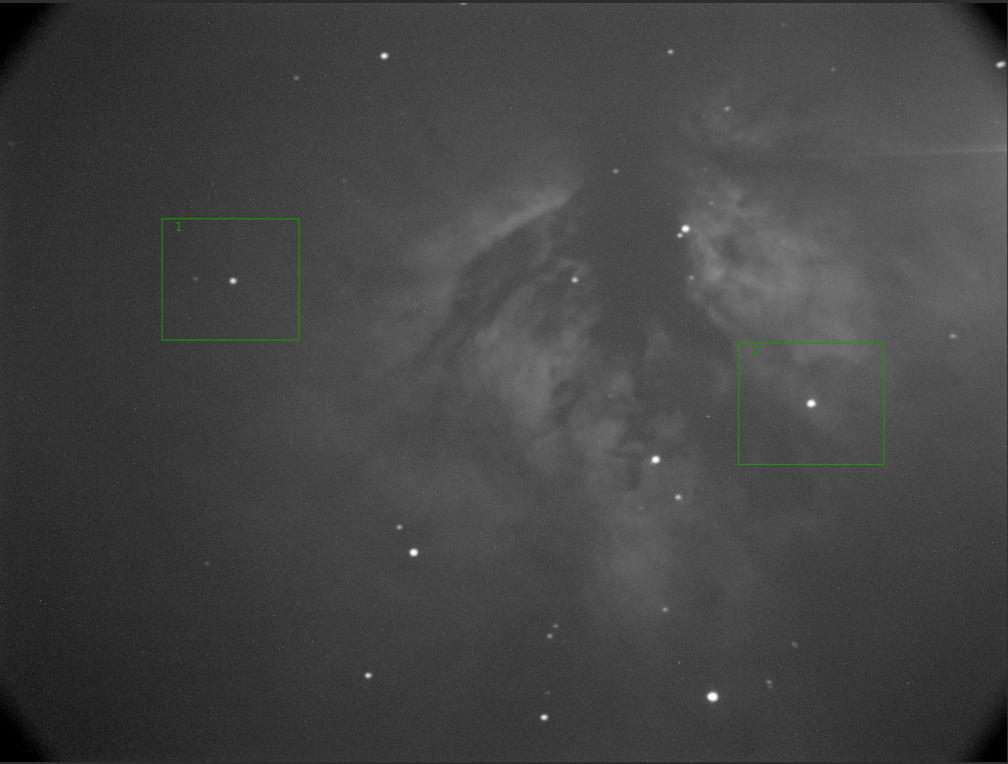
It is very important to have a reference image already set with the Frame selector. By default, it is the first image. The user is free to choose the one he wants. It will be used as a reference layer, seen by transparency, to align the images manually with the numerical buttons. Then, browse the image one by one to apply the same method to the whole sequence.
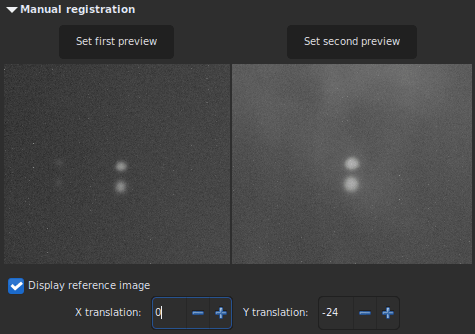
The Y-shift is too large, same stars on different frames do not overlap.
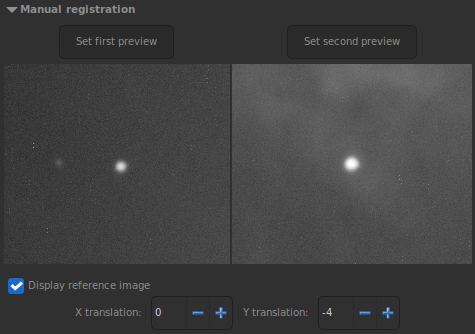
X- and Y-shift look fine. The current image is aligned to the reference one.
Apply Existing registration
This is not an algorithm but rather a commodity to apply previously computed registration data stored in the sequence file. The interpolation method can be selected in the Output Registration section. You can also use image filtering to avoid saving unnecessary images, as in stacking Image rejection. There is also a Drizzle option to apply registration using Drizzle instead of interpolation. See the Drizzle section for details.
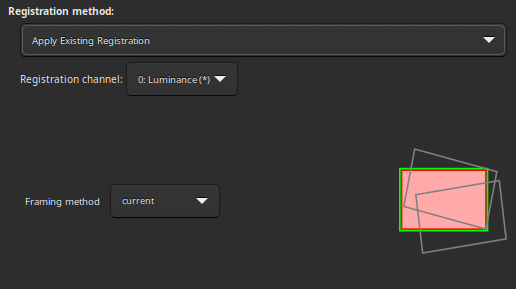
Four framing methods are available:
: current uses the current reference image. This is the default behavior.
: maximum (bounding box) adds a black border around each image as required so that no part of the image is cropped when registered.
: minimum (common area) crops each image to the area it has in common with all images of the sequence.
: center of gravity determines the best framing position as the center of gravity (cog) of all the images.
Siril command line
seqapplyreg sequencename { -upscale | -drizzle { [-scale=] [-pixfrac=] [-kernel=] [-flat=] } } [-interp=] [-noclamp] [-layer=] [-framing=] [-prefix=] [-filter-fwhm=value[%|k]] [-filter-wfwhm=value[%|k]] [-filter-round=value[%|k]] [-filter-bkg=value[%|k]] [-filter-nbstars=value[%|k]] [-filter-quality=value[%|k]] [-filter-incl[uded]]
[-filter-fwhm=value[%|k]] [-filter-wfwhm=value[%|k]] [-filter-round=value[%|k]] [-filter-bkg=value[%|k]]
[-filter-nbstars=value[%|k]] [-filter-quality=value[%|k]] [-filter-incl[uded]]
Output Registration
This frame contains all the output elements for the sequence.
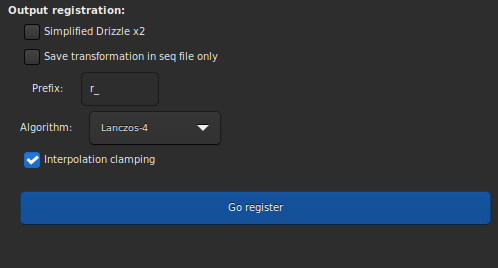
The button Drizzle activates the drizzle algorithm for the processing of this sequence. See the Drizzle section for details.
Warning
The counterpart of this technic is that the amount of memory and disk space needed to create and process drizzled images is multiplied by the square of the Drizzle scale factor.
When button Save transformation in seq file only is checked, the transformed images are not saved as a newly registered sequence. In both cases, the transformation matrices are saved to the sequence file. The registration data can then be inspected and some images unselected, prior to applying the transformations using the Apply Existing Registration method. This option is automatically checked for alignment method that produce shift only registration data. If this option is unchecked, then it is possible to define a prefix for the new sequence that will be created. By default it is
r_.If a new sequence is created, with the application of a complete transformation, then the pixels of the resulting images are interpolated by an algorithm that is left to the user's choice. There are 5 possible interpolation algorithms, plus a None option:
Nearest Neighbor
Bilinear
Bicubic
Pixel Area Relation
Lanczos-4
None
The most efficient interpolation methods are generally bicubic and Lanczoz (used by default). However, they usually require the Clamping interpolation option to be enabled to avoid ring artifacts around the stars. But the latter may be useless in some cases. We recommend you to test with your images.
The special case of None is reserved for the case of global registration and Apply Existing registration. If you want to export or save a sequence that contains only translation, without using interpolation (so as not to modify the pixel values), you should select None.
Last option Accumulate reg. data, must be checked if you want the new registration data to be added to the previous one. This option is useful when sequence has previously been aligned using a method that does not build a new sequence, but it should be unchecked when the comet/asteroid algorithm is applied several times.
Astrometric registration
Introduced in version 1.3, this is the prefered mode for assembling mosaics or images with little overlap. Its panel is very similar to Apply Existing registration as the information to export the registered images has already been computed when platesolving the sequence.
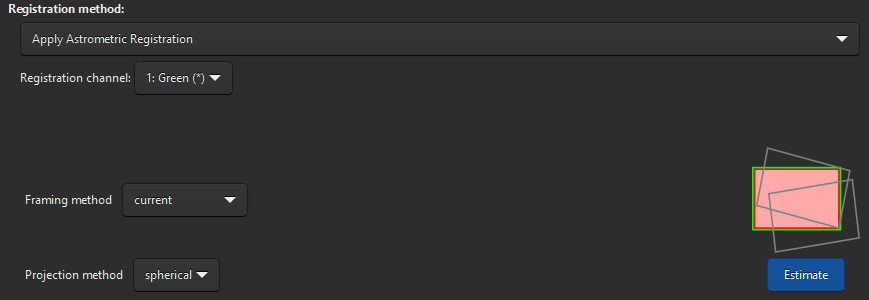
Apply Astrometric Registation panel
The options specific to this mode are:
Projector method to choose between
Spherical(for large fields of view) orPlanarEstimate button that will launch the framing computation but without actually exporting the images. This information can be interesting to know in advance the size of the exported images. This accounts for the framing method selected and the scaling factor chosen in the Output Registration
When pressing Estimate, the console will show an output like this:
Output image: 4961 x 4605 pixels (assuming spherical projection and a scaling factor of 0.80)
Space required for storage: 130.7 MiB
The output registration panel also has also some specifics:
undistort option to use SIP coefficients. This will only be enabled if the astrometric solution of the images contain said coefficients. This can prove useful when aligning images in presence of optical distortion.
Scaling can be set between 0.1 and 2 to better control the size of the output images.
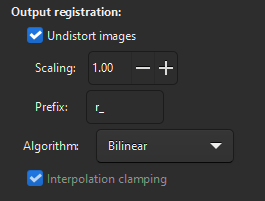
Output registration for astrometric registration
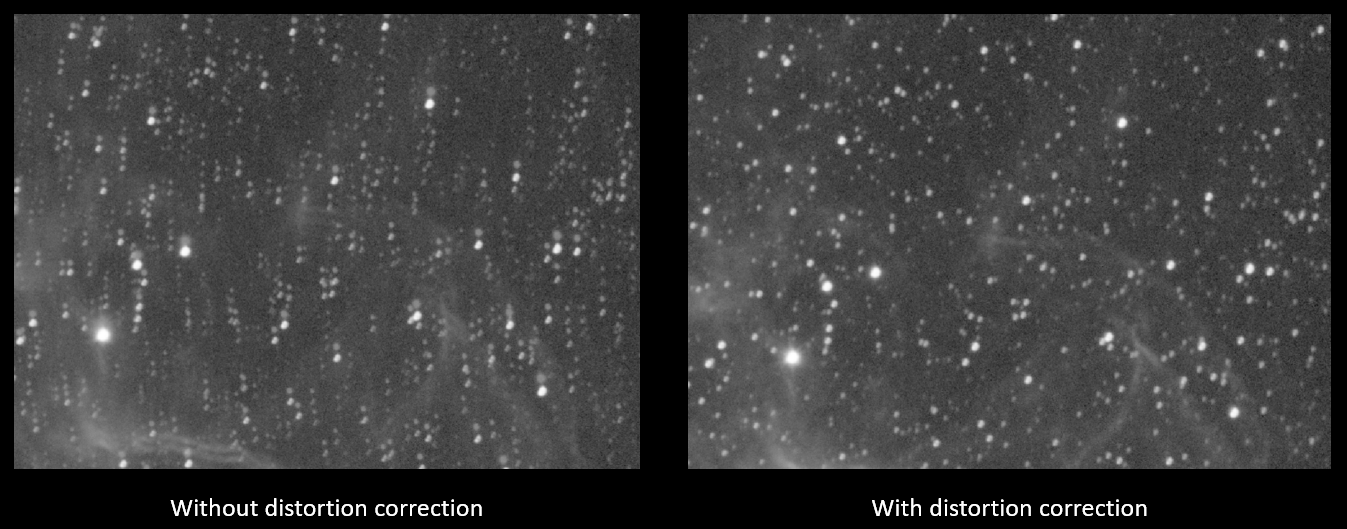
Effect of undistortion on two overlapping panels after registration
Siril command line
seqapplyastrometry sequencename [-interp=] [-noclamp] [-noundistort] [-projector=] [-scale=] [-framing=] [-prefix=] [-filter-fwhm=value[%|k]] [-filter-wfwhm=value[%|k]] [-filter-round=value[%|k]] [-filter-bkg=value[%|k]] [-filter-nbstars=value[%|k]] [-filter-quality=value[%|k]] [-filter-incl[uded]]
[-filter-fwhm=value[%|k]] [-filter-wfwhm=value[%|k]] [-filter-round=value[%|k]] [-filter-bkg=value[%|k]]
[-filter-nbstars=value[%|k]] [-filter-quality=value[%|k]] [-filter-incl[uded]]
References
Fischler, M. A., & Bolles, R. C. (1981). Random sample consensus: a paradigm for model fitting with applications to image analysis and automated cartography. Communications of the ACM, 24(6), 381-395.
Valdes, F. G., Campusano, L. E., Velasquez, J. D., & Stetson, P. B. (1995). FOCAS automatic catalog matching algorithms. Publications of the Astronomical Society of the Pacific, 107(717), 1119.