メインインタフェース
Sirilを起動すると、メインインタフェースが開きます。
注釈
下の画像の任意の場所をクリックすると、その機能が表示されます。

画像領域
この領域には現在読み込まれている画像が表示されます。赤、緑、青 のいずれかをクリックすると、各レイヤーに切り替えることができます(カラー画像のみ、白黒画像では 白黒 タブ1つが利用可能です)。
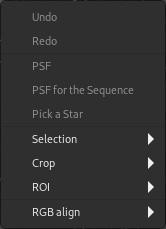
画像上で右クリックすると、コンテキストメニューが表示されます:
Tip
画像が読み込まれていない場合は、画像領域をダブルクリックすると、ファイルを開く ダイアログがポップアップ表示されます。
取り消し
直前の操作を取り消します。
やり直し
直前に取り消した操作をやり直します。
点像分布関数
現在の選択領域の点像分布関数を計算し、迅速な測光を行ないます。
シーケンスに対する点像分布関数
現在のシーケンス内のすべての画像について、現在の選択領域の点像分布関数を計算します。
星を検出
現在の選択領域に星検出を適用します。その結果は 動的点像分布関数 ダイアログに表示されます。この操作は、星を含む選択領域を選んだと仮定しているため、全画像星検出ルーチンよりも甘いことに注意してください。そのため、全画像星検出機能で見落とした星を選ぶのに使えます。
選択
選択矩形に制約を適用します。
切り抜き
切り抜き および 切り抜きと回転 機能へのインタフェースを提供します。
Tip
If a CFA image is loaded, the crop will be constrained to a CFA boundary so that the effective CFA pattern is unchanged for future operations. For Bayer CFA patterns this means the crop selection will snap to a multiple of 2x2 and may shift by up to 1 pixel in x and y directions in order to align with the Bayer pattern start. For X-Trans patters the crop selection will snap to a multiple of 6x6 and may shift by up to 5 pixels in each direction.
警告
Rotating a CFA image by arbitrary angles will destroy the CFA pattern: you should progress your workflow to the point where the CFA pattern has been debayered or Bayer drizzled before doing anything that applies rotation or scaling.
ROI
ROI処理のために関心領域(ROI)を設定またはクリアするためのインタフェースを提供します。UI設定タブでROIモードが "選択領域から自動"に設定されている場合、このメニューエントリは利用できません。
RGB align
Aligns the image RGB channels. This supports a range of registration methods for alignment:
2-pass global star alignment This uses the 2-pass global star alignment routine with COG framing (so the image dimensions are preserved). This algorithm adjusts with 8 degrees of freedom so it can correct for image shift, rotation and skew. This is the recommended algorithm for images containing stars. This algorithm is global and does not require a selection to be made.
KOMBAT alignment This uses the KOMBAT alignment method. It is primarily intended for planetary alignment, but can also work for deep space images. It provides shift registration only, but is fast. This algorithm requires a selection to be made.
One star registration This is an older algorithm that provides shift-only registration based on the movement of a single star. This is very fast but the registration cannot cope with as many degrees of freedom as the 2-pass global star alignment. It may be suitable if you are certain you only need to correct for image shift. This algorithm requires a single star to be selected.
Image pattern alignment This method performs alignment using the image Fourier transforms. It works for deep space and planetary images but provides only shift registration and is quite slow. This algorithm uses a square selection: a selection must be made, and non-square selections will be corrected to be square.
警告
The tool is RGB align. It is not intended for, and will not work for, aligning unaligned LRGB compositions. In order to do this you must either align the layers to be composed before composition, or align using the RGB alignment tool.
開く
このアイコン(左から右)をクリックすると:
ファイルを開く
最近使用したファイルを開く
作業ディレクトリ を変更する
Livestack
Click on this button to start a Livestacking session.
取り消す/やり直す
これらのボタンは、直前のアクションの取り消し/やり直しに使用します。これは、コマンドを入力するのではなく、GUIを介して直前のアクションを実行した場合にのみ使用できます。
画像処理
このボタンをクリックすると 処理 メニューが表示されます。
ツール
このボタンをクリックすると ツール メニューが表示されます。
スクリプト
このボタンをクリックすると スクリプト が表示され、起動します。
情報バー
このバーはSirilの現在のバージョンと現在の 作業ディレクトリ へのパスを表示します。
右側には、使用可能なRAMとディスク容量に関する情報も表示されます。
Sirilで使用可能なスレッド数は、+/-記号で変更できます。
保存
これらのボタンは、結果を保存するために使用します:
現在の画像を保存(上書き)する。
別の名前や拡張子を付けて保存する。

保存ダイアログボックス。
右下のドロップダウンリストで、記録する画像の種類を選択できます。ファイル名には自動的に拡張子が追加されます。ただし、サポートしている画像ファイル モードのままで、Sirilがサポートする任意の拡張子を手で追加することができ、正しいファイル形式で保存されます。
現在のビュー(画面に表示されている状態、つまり、もしあればプレビューの拡大表示が適用された状態)のスナップショットを撮影します。2つのオプションがあります。スナップショットをクリップボードに保存するか、または 作業ディレクトリ に直接保存します。
現在の画像のビット深度を変更します。16ビットと32ビットから選択できます。
メインメニューを開きます。ハンバーガーメニュー とも呼ばれます。設定 やドキュメントなどにアクセスできます。
タブ
タブの一つを選択します。F1 から F7 のショートカットでタブを切り替えることもできます。
詳細は以下を参照してください:
タブ |
キー |
|---|---|
F1 |
|
F2 |
|
F3 |
|
F4 |
|
F5 |
|
F6 |
|
コンソール |
F7 |
タブウインドウ
現在選択されているタブの詳細を表示します。
マウスの振る舞い
SirilはGTKのプライマリ、セカンダリ、ミドルのマウスボタンマッピングを使用します。これらは通常、マウスの左、右、真ん中 (scroll ホイールボタン) の物理ボタンにマッピングされますが、特定のセットアップでは異なるマッピングになることがあります (例えば、左利きのユーザーは左と右のボタンが入れ替わるように設定されているかもしれません)。
Primary mouse button
The primary mouse button is used for a number of purposes:
To select areas of the image
With Ctrl pressed (or Cmd on MacOS), to pan the image
When the intensity profiling tool is active, to drag the line along which the intensity profile is to be drawn, and to select points corresponding to known wavelengths / wavenumbers in the spectroscopy setting
In the RGB composition tool, to select the rotation center when using manual alignment
In the gradient removal tool, to draw samples
In photometry mode, to perform photometry on a star
To select the positions for the registration previews
Double clicking the primary mouse button with no image loaded will bring up the Open dialog.
Secondary mouse button
The secondary mouse button is used for a number of purposes:
To bring up the image context menu (except when in photometry mode)
In the gradient removal tool, to remove samples
In photometry mode, to perform photometry on the selected star for all frames of the currently loaded sequence (if no sequence is loaded, this has no effect)
Middle mouse button
The middle mouse button is used for the following purposes:
To pan the image at the current zoom level
With Ctrl pressed (or Cmd on MacOS), to make a square selection suitably sized for photometry
Double clicking adjusts the zoom level to a preset value. The behaviour is configurable in the User Interface tab in the Preferences dialog. The choices are:
Always zoom to fit
Always zoom to 100% centered on the mouse cursor
Toggle between zoom to fit and zoom to 100% centered on the mouse cursor
Scroll wheel
The scroll wheel is used to adjust the zoom level.
コマンドライン
コマンド を入力して Enter を押す。
行の端にあるボタンを押せば、使い方のヘルプを見ることができます。
停止 ボタンをクリックすることで、現在実行中のプロセスを中断することもできます。
展開
このバーをクリックすると、タブ全体/タブウィンドウの領域が展開/縮小されます。
画像スライダー
上下のスライダーを使って、プレビュー画像のホワイトポイントとブラックポイントを調整します(リニアモードの場合)。
Tip
読み込んだ 画像 または シーケンス の名前をクリックすると、その名前がクリップボードにコピーされます(コマンドに貼り付けるのに便利です)。
プレビューモード
読み込んだ画像のプレビューモードを以下の選択肢から選びます:
線形
対数
平方根
平方
Asinh
Autostretch (tick the High Definition box to use a deeper (up to 24-bit, configurable in Preferences) LUT instead of the default 16-bit one)
ヒストグラム
In Autostretch mode with color images, the toggle to the right activates/deactivates channel linking. When unlinked, the 3 layers are stretched independantly so as to give a more balanced image.
警告
This is just a preview of the image, not the actual data (except if Linear mode is selected). Do not forget to stretch your images before saving them.
特別なビュー
以下の色でプレビュー画像を表示するには、これらのトグルを使用します:
反転色
in false colors
天体測量ツール
Use these toggles to show:
astrometric annotations
celestial grid
警告
The loaded image needs to be plate-solved for these buttons to be active.
Quick photometry
Use this toggle to trigger the quick photometry mode.
強度プロファイル
Use this toggle to trigger the intensity profile mode.
ズーム
以下のことをするには、これらのボタンを使います:
ズームアウト
ズームイン
利用可能なウインドウ領域に合わせて表示
実際の大きさで表示
Tip
Ctrl+left clic will allow to navigate into the picture
Tip
Ctrl+mouse scroll will zoom in/out and Ctrl + 0 / 1 will zoom to fit/100%.
Tip
Ctrl+Shift and drag with the primary mouse button will measure the distance between two points. If sufficient metadata is available the measurement will be given in degrees, minutes and arcseconds, otherwise it will be given in pixels.
幾何学的変形
以下のことをするには、これらのボタンを使います:
左に回転
右に回転
Mirror about horizontal axis
Mirror about vertical axis
フレームの選択
このボタンをクリックすると、フレームセレクター が開きます。