Quick photometry
Photometry areas explained
As Siril only performs aperture photometry, it's important to understand and set the correct parameters.
The stars are modeled according to your choice: Gaussian or Moffat as described here in the Dynamic PSF chapter.
So a particular star on a particular image has its own FWHM.

PSF and photometry terms.
The aperture photometry process needs 3 radii:
The outer circle, defined by the outer radius (most often expressed in pixel).
The inner circle, defined by the inner radius (most often expressed in pixel). These 2 circles define the annulus which is used to measure the background (that is the sky level + additional noise).
The aperture circle, defined by the aperture radius. It can be expressed in pixel or as a ratio of the star FWHM (the automatic checkbox in the window). This area is used to measure the star signal added to a background signal.
These 3 radii can be set and tweaked individually from the GUI tab.
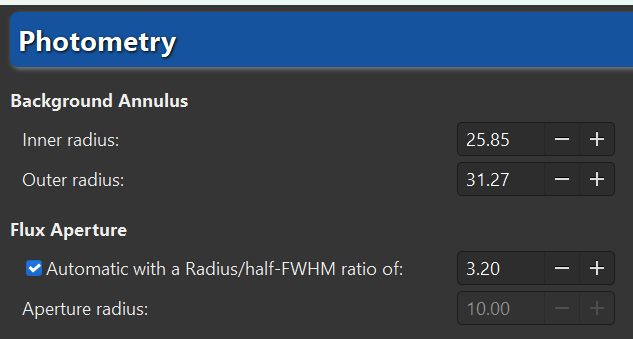
Radii settings.
Or via the command line interface:
Siril command line
setphot [-inner=20] [-outer=30] [-aperture=10] [-dyn_ratio=4.0] [-gain=2.3] [-min_val=0] [-max_val=60000]
Tip
These radii settings apply to all aperture photometric processes: quick photometry and Light Curves. Check them carefully.
Photometry on hand-picked objects of a single image
The quick photometry button  is a button located in the
toolbar and used to perform a photometry of the stars, this is generally the
simplest way to proceed.
is a button located in the
toolbar and used to perform a photometry of the stars, this is generally the
simplest way to proceed.
Tip
If the star is in the middle of several stars and the tool fails to point to the right star, an alternative solution is to draw a selection around the star and then right-click and click on PSF. It may also be interesting to know that Ctrl-middle click (or Cmd-middle click on MacOS) draws a selection of a recommended size for PSF/photometry (based on the configured outer radius).
Tip
When photometry is performed on the RGB layer, the results are actually calculated on the green layer. To obtain photometry on the red or blue layers, you need to work on the corresponding channels.
Siril command line
psf [channel]
Click on this button to change the image selection mode, then click on a star. The photometry and the PSF (Point Spread Function) of the star are computed, giving plenty of details.
Two models are used for the calculation of the PSF, which can be selected by the user in the Dynamic-PSF window (Ctrl + F6).
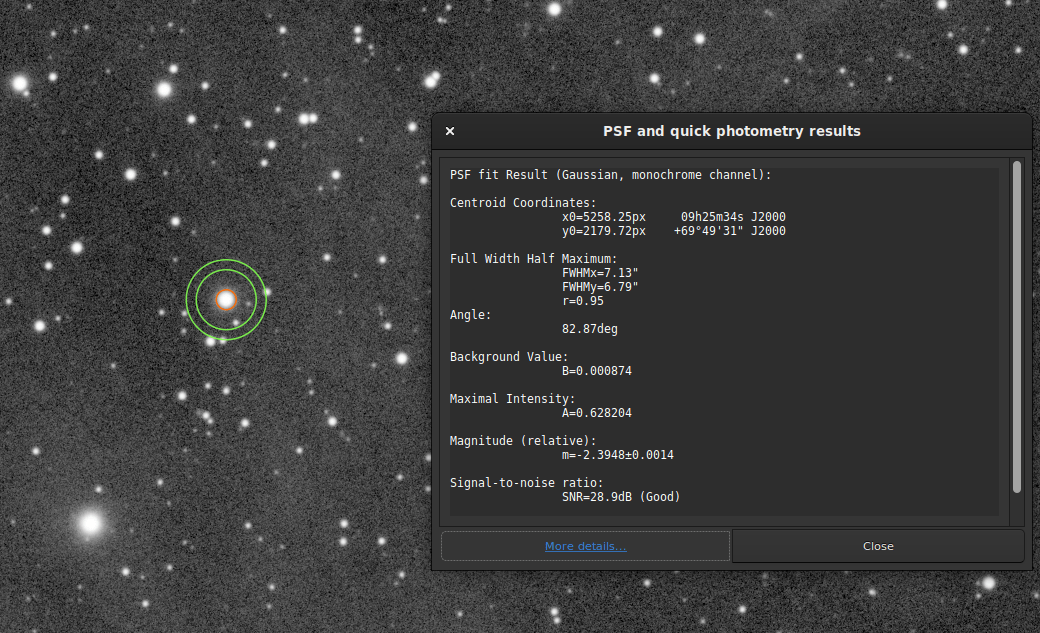
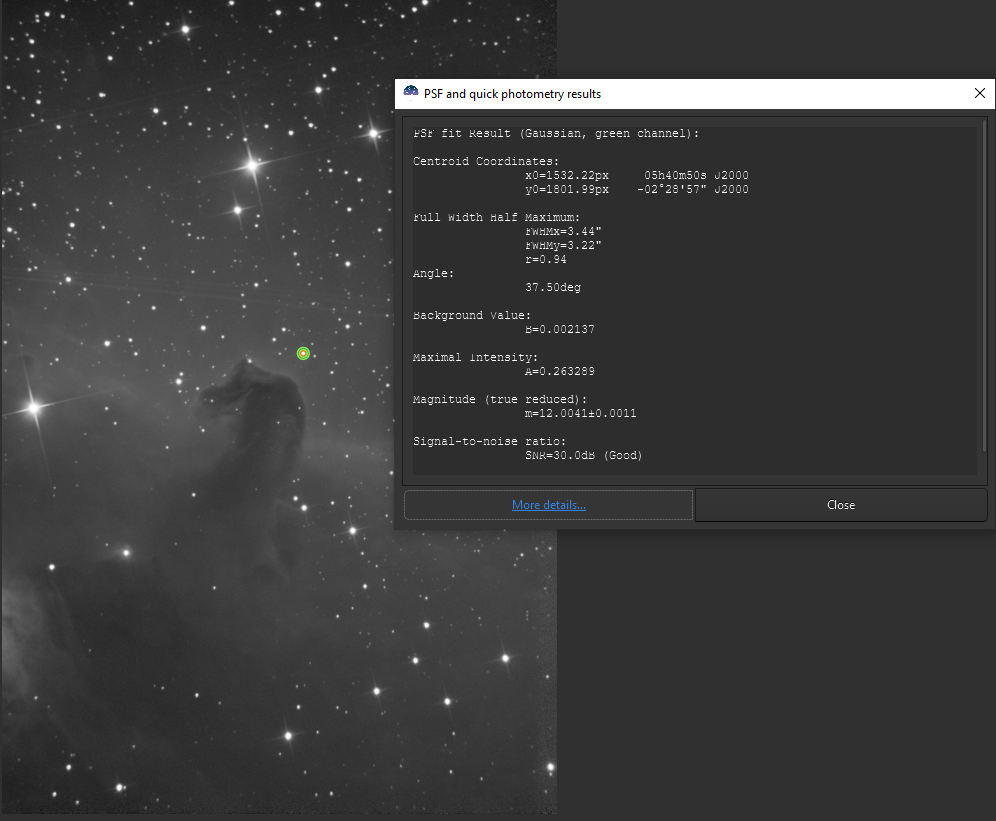
Photometry results window.
The result of the photometry and the associated PSF are displayed in the form:
PSF fit Result (Gaussian, monochrome channel):

Centroid Coordinates:
            x0=5258.25px     09h25m34s J2000
            y0=2179.72px    +69°49'31" J2000

Full Width Half Maximum:
            FWHMx=7.13"
            FWHMy=6.79"
            r=0.95
Angle:
            82.87deg

Background Value:
            B=0.000874

Maximal Intensity:
            A=0.628204

Magnitude (relative):
            m=-2.3948±0.0014

Signal-to-noise ratio:
            SNR=28.9dB (Good)

RMSE:
            RMSE=1.890e-03
The fit was done with the Gaussian fitting function so no additional parameters are needed. However, if Moffat was used, the following output will be shown:
PSF fit Result (Moffat, beta=2.9, monochrome channel):
Centroid Coordinates gives the coordinates of the centroid in pixels. However, like in the example above, if astrometry was set on the image, Siril gives coordinates in the World Coordinate Systems (RA and Dec).
Full Width Half Maximum (FWHM) is returned in arcsec if the image scale is known (obtained from its header or from the GUI ) and in pixels if not. The roundness r is also computed as the ratio of \(\frac{\text{FWHMy}}{\text{FWHMx}}\).
Angle is the rotation angle of the X axis with respect to the centroid coordinates. It varies in the range \([-90°,+90°]\).
Background Value is the local background in the \([0,1]\) range for 32-bits images and \([0,65535]\) for 16-bits images. This is a fitted value, not the background computed in the aperture photometry annulus.
The maximum Intensity value is also a fitted value and represents the amplitude. It is the maximum value of the fitted function, located at the centroid coordinates.
The magnitude, given with its uncertainty, is the result of photometry. However, if for some reasons the calculation cannot be done (saturated pixels or black pixels), an uncertainty of 9.999 is given. In this case, the photometry is flagged as invalid but a magnitude value is still given, although it should be used with caution. Here magnitude is uncalibrated, show with the (relative) keyword, see the next section for absolute magnitude calibration.
An estimator of the signal-to-noise ratio is shown in the results. Its value is calculated from the following formula and given in dB:
(1)\[ \text{SNR} = 10 \log_{10}\left(\frac{I}{N}\right)\]where I is the net intensity, proportional to the observed flux F and N the total of uncertainties as expressed in (18).
For easier understanding, it is associated with 6 levels of quality:
Excellent (SNR > 40dB)
Good (SNR > 25dB)
Satisfactory (SNR > 15dB)
Low (SNR > 10dB)
Bad (SNR > 0dB)
N/A
This last notation is displayed only if the computation failed, for one reason or another.
Finally, RMSE gives an estimator of the fit quality. The lower the value, the better the result.
When the image is plate-solved, the button More details at the bottom of the window links to a page on the SIMBAD website with information about the selected star. However, it is possible that the page does not give any additional information if the star is not in the SIMBAD database.
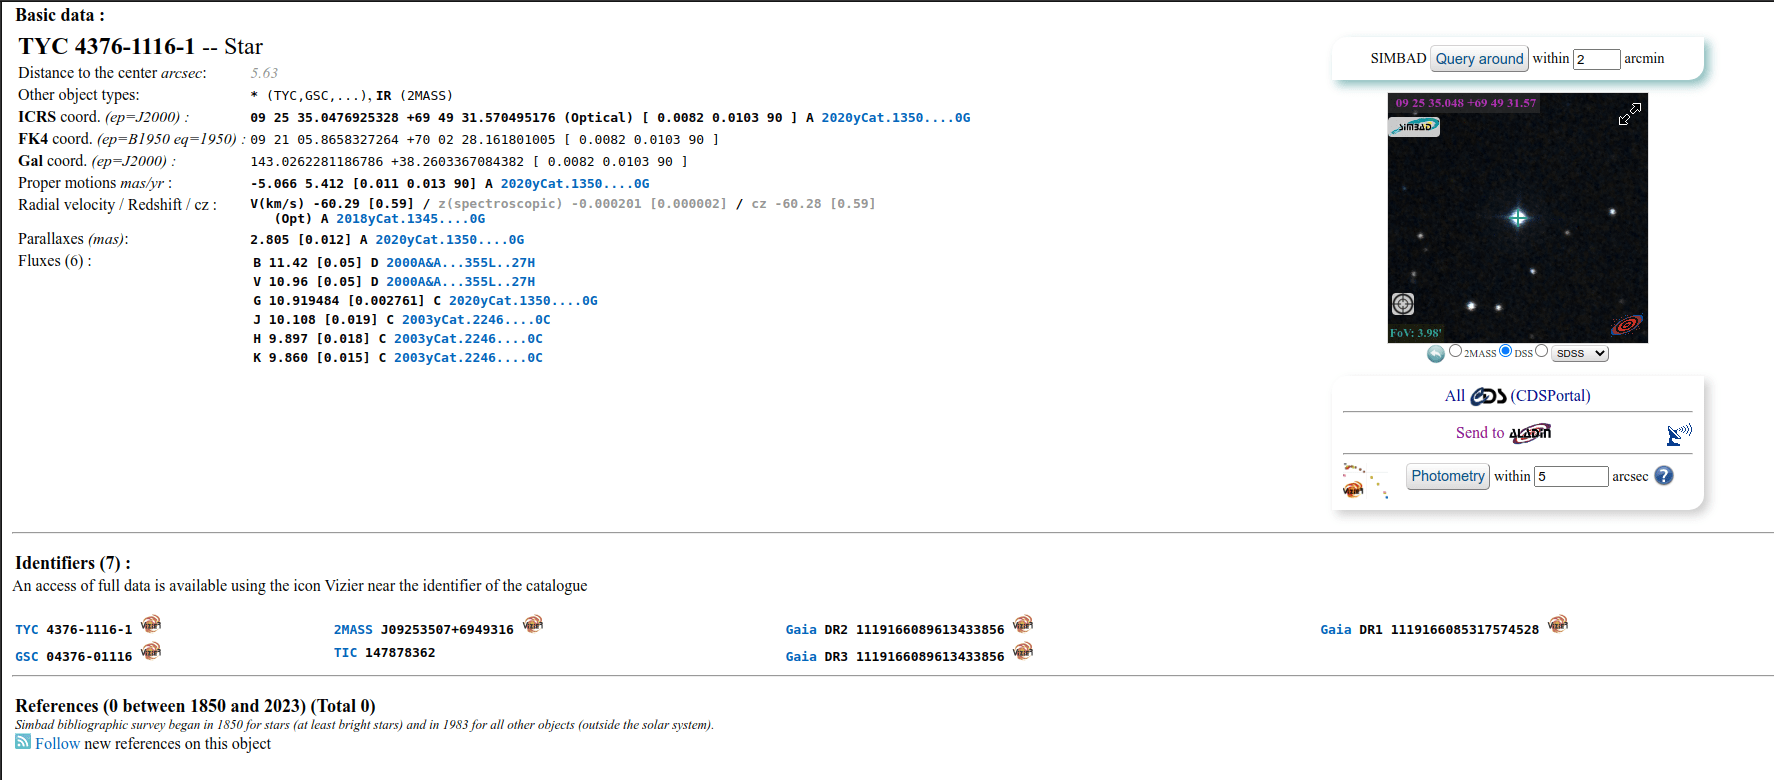
More details about the analyzed star. Click on the picture to enlarge.
Quick photometry on sequences
Quick photometry can also be performed on a sequence. This is generally intended to obtain a light curve as explained here. To proceed, you must load a sequence, make a selection around a star, then right click on the image.
Tip
Ideally, the sequence must be registered without interpolation so as not to alter the raw data. For example, use the global registration with the option Save transformation in seq file only.
Note
Make sure the inner and outer radii for the background annulus are adapted
to the star and sequence being analyzed. Some images may have much larger
FWHM than the reference image, because of sky conditions or bad tracking.
They can be changed in the preferences or with the setphot command.
At the end of the process, Siril automatically opens the plot tab showing computed curves. It is possible to click on several stars to reproduce the calculation, however the first star keeps the particular status of variable, and the others serve as references. This is important in the calculation of the light curve.
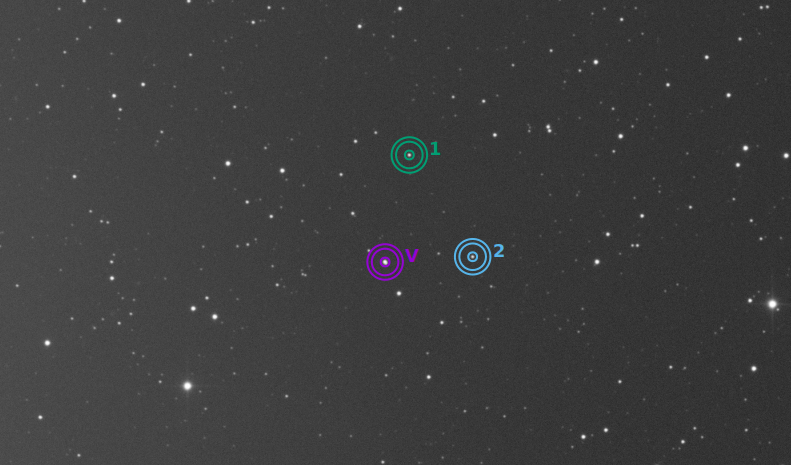
In this example, 3 stars have been analyzed. The first one is used as variable. The others are references.
Computing true magnitudes
By default, calculated magnitudes are uncalibrated and only meaningful if compared to others in the linear image. The value given does not correspond at all to the true apparent magnitude of the object, also called relative magnitude.
Siril provides two tools that can be used to calibrate image magnitudes, which then enable magnitude computation to give apparent magnitudes: manual calibration on a single star or automated calibration using stars from a catalogue. In both cases it is important to calibrate the images first, with flats in particular, or magnitudes measured in different areas of images may not translate to the same equivalent apparent magnitudes in reality. Gradients will cause the same problem.
Manual calibration, single star
This technique requires selecting another star from the image as reference for apparent magnitude. The star is selected manually, with a selection drawn around it and its catalogue magnitude is given for the corresponding imaging filter.
Because it uses a single star, the results will be approximate because of the variations a single star can have in magnitude across several images, caused by various noise sources. For a greater precision, the reference star should be chosen of similar color and magnitude as the star(s) you want to measure. Catalogues contain magnitudes computed using a photometric filters, which is generally not what amateurs use to make nice pictures, this adds another approximation.
Do a quick photometry on a known star, the given relative magnitude is
-2.428. It is possible to find out the actual visible magnitude by clicking on the More details button as explained above. Let's say the value found is11.68(make sure you use a value corresponding to the spectral band of the image, or V (for visual) for general purpose magnitudes).Once done, keep the star selected, then enter the following command in Siril
setmag 11.68
That will output something like
10:50:49: Relative magnitude: -2.428, True reduced magnitude: 11.680, Offset: 14.108
Siril command line
setmag magnitude
Calibrates the magnitudes by selecting a star and giving the known apparent magnitude.All PSF computations will return the calibrated apparent magnitude afterwards, instead of an apparent magnitude relative to ADU values. Note that the provided value must match the magnitude for the observation filter to be meaningful.To reset the magnitude constant see UNSETMAGNow, all calculated magnitudes must have values close to their true visual magnitude. It will remain set as long as Siril is running, so it will have to be done again next time it is started.
Photometry results window with true magnitude set.
To unset the computed offset, just type
unsetmag
Tip
The same commands exist for the sequences. They are seqsetmag and
sequnsetmag. It is used in the same way when a sequence is loaded.
Siril command line
seqsetmag magnitude
Siril command line
sequnsetmag
Automated calibration, many stars
The new technique introduced in Siril 1.5 uses all stars from catalogue that appear in the image and for which photometric analysis succeeded with a signal to noise ratio above 3. The selected catalogue will be the local astrometric Gaia DR3 catalogue if available (installation recommended), if not the local Tycho2 + NOMAD catalogue (from KStars) if available, if not then the remote Gaia DR3 catalogue is used.
It is possible to only select stars of similar colour as the target in the computation to have a more reliable magnitude calibration. This is mostly useful if no photometric filter is used. In those conditions, red and blue stars will not appear with the same apparent magnitude as given in catalogues because of the slope of their spectrum over the visible spectrum and the response of the imaging system.
A prerequisite to the use of this tool is to plate solve the image.
It is available through .
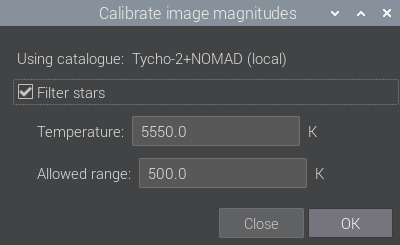
Automated magnitude calibration tool window.
Star filtering can be done using their black body equivalent temperature and the allowed range. The local astrometric Gaia DR3 catalogue does not contain much photometric data but it still has some magnitude information and temperature of the star (compared to the photometric one that contains spectral data). We can use it for this photometric scenario. In case Tycho2 + NOMAD catalogues are used, the temperature is automatically converted to a B-V value using the formula from Ballesteros 2012. This is also available as a command as shown below.
Siril command line
catmag [reftemp] [dtemp]Computes the abolute magnitude reference using by order or preference the local Gaia catalog, the local NOMAD catalog or the remote Gaia catalog, using a single channel (green for color images). Stars used for the calibration can be filtered by color, using a reference temperature (reftemp) and a range (dtemp) if Gaia is used, automatically converted to B-V values if NOMAD is used. This filtering should be chosen to match the filter used for capture. The computed offset value is global, for all images until siril is restarted. See also SETMAG for manual operation and UNSETMAG to reset it