Multi-Point Registration and Stacking
Multi-point registration and stacking was introduced in Siril 1.5. This is an advanced registration method suitable for planetary videos. Initially worked on with the support of Rolf Hempel (the author of PlanetarySystemStacker), the code lay dormant from the 0.9 release cycle before later being reworked to become a mature feature. The process is split into a registration stage and a stacking stage, following the usual Siril workflow and using the customary GUI tabs.
Multi-Point Registration
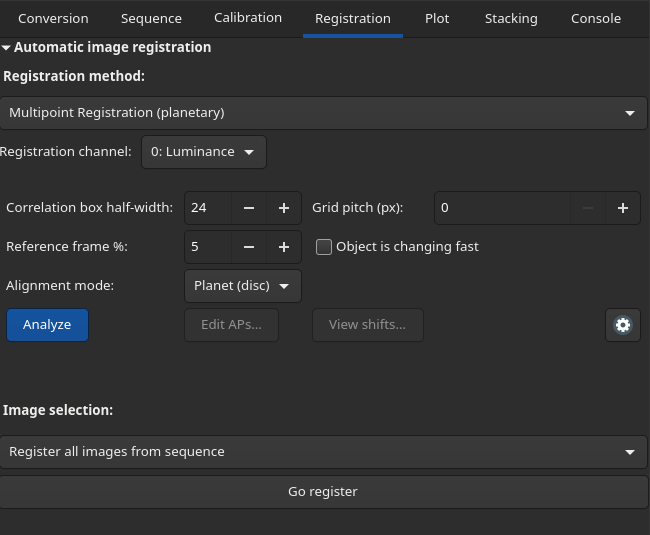
This method is selected in the same way as other registration methods, using the dropdown in the Registration tab. Selecting the method shows the relevant parameters.
Parameter
The Registration tab shows the handful of parameters that are adjusted most often. The cog button beside them opens an Advanced settings window (described in the next section) holding the remaining, more rarely changed controls, so the main tab stays uncluttered.
Registration channel: this parameter is ignored for this method: registration is conducted against a luminance reference frame.
Correlation box half-width: sets the half-width, in pixels, of each alignment point's correlation box - the area over which its local shift is measured, drawn as the solid boxes in the image overlay. In the case of noisy images or low local contrast, a larger box is recommended. The stacking patch and the default alignment-point spacing both derive from it; the Grid pitch control can override the spacing independently. The default is 24.
Grid pitch: the spacing between alignment points in pixels, decoupled from the
correlation box (which keeps its full size). 0 (the default) is automatic: 2.25 x the
correlation-box half-width, i.e. 54 px at the default half-width of 24. To sample the seeing
distortion more finely, keep the correlation box at its default size and reduce the pitch - values
down to about the half-width (24-27 px) work well - rather than shrinking the correlation box,
which starves the shift measurement of signal.
Reference frame %: sets the percentage of the sequence's best frames averaged together to produce the reference frame. Applies whether or not Object is changing fast is set. The default is 5.
Object is changing fast: Set this for objects that change during the sequence (e.g. Jupiter or the Sun) to generate the reference frame from as short a region of the sequence as possible: where the object is rotating or changing fast, this can improve the sharpness of the reference frame. For non-fast moving images, disabling this will allow selection of the best frames from the full duration of the sequence when creating the reference frame.
Alignment mode: sets the global frame alignment mode. When a sequence is loaded Siril inspects the first frame and pre-selects a sensible default, but you can override it. The options are:
Planet (disc): the default. Aligns on the brightness centroid - fast and robust for a full planetary disc (including Saturn) against a dark background.
Surface (detail): correlates an auto-picked detail patch. This will work for planetary discs but is slower and potentially less robust to videos with larger jumps between frames; it is ideally suited for surfaces such as lunar or solar details where full-disc alignment cannot work.
AVI Bayer pattern: this widget is only shown when the loaded sequence is an AVI (film) container. AVI files carry no colour-filter (Bayer) marker, so Siril cannot tell a mono video from a one-shot-colour one. Auto lets Siril guess; None (mono) forces mono treatment; the four Bayer values (RGGB, BGGR, GBRG, GRBG) mark the video as raw one-shot-colour with that filter pattern, so it is debayered to colour before stacking. This hint is ignored for SER and FITS sequences, which carry their own Bayer metadata.
Advanced settings
The cog button beside the registration parameters opens the Advanced settings window. It groups the finer registration controls together with the settings that are rarely changed and the stack-time demosaicing choice, keeping the main tab uncluttered; the defaults are sensible and most users will never need to change them. The window can be left open while you work: its settings are read whether or not it is visible, and a Reset button restores every control to its default.
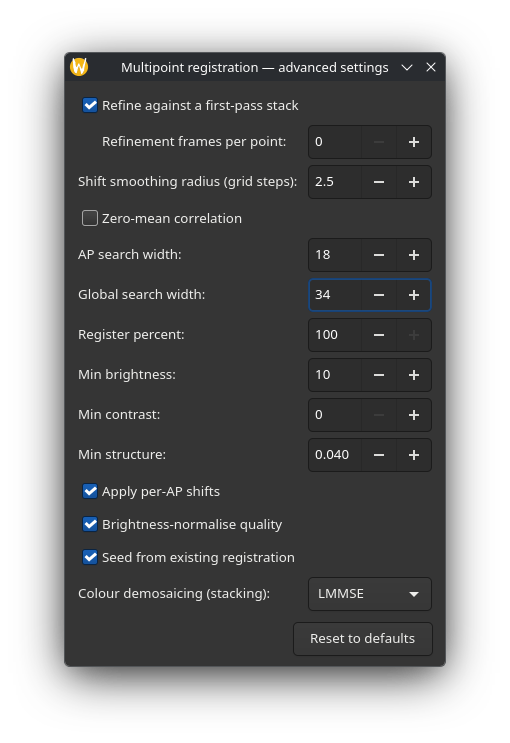
Refine against a first-pass stack: enables a second registration pass (on by default). In the first pass every alignment point is measured against the seeing-averaged reference frame, which is itself somewhat soft. When refinement is on, Siril then stacks the sharpest few frames at each alignment point using the first-pass shifts to build a much sharper local reference, and re-measures every shift against it. This tightens the shift measurement, most noticeably on low-contrast surface texture such as solar granulation. Any point whose second-pass measurement fails simply keeps its first-pass shift.
Refinement frames per point: the number of frames per alignment point that build the
sharpened refinement reference. 0 (the default) auto-selects 5% of the frames, clamped to
between 8 and 32.
Shift smoothing radius: the radius, in grid-step units, of a robust per-frame smoothing
of the alignment-point shift field (default 2.5; 0 disables it). Individual per-AP shift
measurements carry noise that is often larger than the true frame-to-frame differences in the
warp, which vary smoothly across the image. A robust local fit over neighbouring alignment points
removes most of that measurement noise while preserving genuine warp.
Zero-mean correlation: uses zero-mean normalized cross-correlation for the per-AP shift measurement (off by default). This makes the match invariant to brightness gain and offset differences between a frame and the reference, for instance from transparency drift. However, on correlation boxes that hold little contrast it roughly doubles the number of failed shift measurements, and the fallbacks cost detail, so it is best reserved for sequences where exposure or transparency changed noticeably.
AP search width: this sets the local per-AP shift search radius between adjacent frames. If no match is found within this distance, the search fails and the AP offset is set to zero. The default is 14.
Global search width: this sets the global alignment search radius between adjacent frames. This is the maximum shift allowed between consecutive frames. If no match is found within this search width, frame alignment is aborted. In that case you can try a higher value (up to 150) for this parameter or, often better, pre-register the video using the Kombat registration method and ensure Seed from existing registration is enabled (see below). The default is 34.
Register percent: sets the percentage of the best frames each AP ranks and computes shifts for during registration, per AP. This is an upper bound on the Stack percent exposed in the Stacking tab: you can lower the percentage at stack time but not raise it beyond this value without re-registering. Lower it only to save compute (and shrink the sidecar) when you already know you will not stack more than this fraction. The default is 100% (register every frame). Note that this does not globally cull bad frames, as bad frames may still contain regions of clarity around some APs.
Min brightness: this sets the minimum brightness for AP auto-placement on an 0-255 8-bit scale. If processing a 16-bit video this value will be auto-scaled to 16-bit 0-65535 range. This parameter avoids AP placement in the sky background.
Min contrast: minimum (max - min) over an AP box. APs below this contrast are rejected. 0-255 scale.
Min structure: normalized gradient magnitude minimum (0-1 range). APs with weaker structure are rejected. Increase this threshold if APs with too little structure have been created.
Apply per-AP shifts: When off, all APs use the same single best-frame shift instead of per-AP shifts. The default is on and this should not normally be changed as per-AP shifts is the whole point of this registration method.
Brightness-normalise quality: divide per-frame Laplacian quality by mean above-threshold brightness for invariance to varying exposure. This is recommended in cases where the atmospheric transparency varied but is always safe and therefore should generally be left at the default (enabled).
Seed from existing registration: Where the image moves significantly between frames, Surface (detail) global alignment may struggle as it correlates detail within a limited distance. If you are unsure if your frames might move by a more significant amount it is recommended to pre-apply a different registration method to eliminate the gross shifts. Kombat works well for this, being fast and pixel-accurate. If registration data is available for the sequence and this option is active, the registration shifts will be used to seed the global alignment. It is not required for Planet (disc) mode as this is already frame-global. If the option is disabled, registration data will be ignored; if no registration data exists, the option will have no effect but will not generate an error. The default is enabled (seed with registration data if available)
Tipp
Note that only shift information is taken from registration data - other aspects of affine or homographic alignment are ignored.
Colour demosaicing (stacking): chooses the demosaicing algorithm used to read
colour-filter-array (CFA) frames at stacking time. The default is LMMSE, which measures around
19% lower colour noise in the stacked result than the previous default (RCD) on noisy captures,
with identical luminance detail. This choice only affects the stack: registration always works from
the raw mosaic, so a single sidecar serves every demosaicing choice. (It can also be overridden
per-stack with the -debayer argument of the stack_mpp command.)
Analyze
Once the parameters are set the Analyze button automatically places Alignment Points (APs) and computes the global shifts between frames and analyzes local AP quality using a Laplacian metric. It then composes and displays a luminance reference frame.
Tipp
Don't worry if you opened the sequence with Debayer enabled and it has now become mono - this is because the reference frame is based on luminance only.
Tipp
For typical Bayer-pattern planetary sequences you don't need to worry about the Debayer option in the Conversion tab / Open dialog. The sequence must be debayered for local AP analysis but this is done automatically regardless of the setting.
After analysis the AP grid is shown. You can use the Edit APs button to open a dialog to edit APs: they can be added by clicking, deleted by right clicking or dragged with the mouse, or you can change the AP size and re-do automatic AP placement.
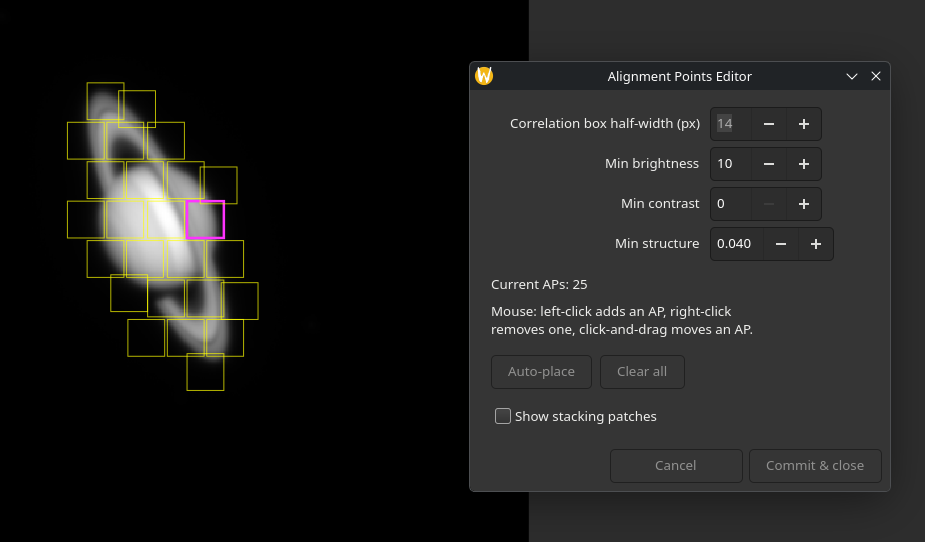
The AP editor allows adjustment of the correlation box half-width and minimum brightness, contrast and structure settings. The current number of APs is shown, as well as a handy guide to how to add, delete and move APs.
The Auto-place button allows to redo the auto-placement of APs. Note this will remove any custom APs you have set. The Clear button allows clearing all APs.
The Show stacking patches button toggles visibility of the full patches used in stacking. (By default, only the correlation boxes are shown, but the full patches extend beyond the correlation boxes in order to allow for blending.)
While the AP editor dialog is open, clicking an AP highlights it and allows its size to be changed individually. This enables tailoring the size of APs to the level of detail / contrast. To change the size of a selected AP the mouse scroll wheel or the + / - keys can be used. APs can also be dragged to move them to a different place in the image. Right-click will delete a selected AP.
Changes to AP size and position, additions and deletions can be undone / redone using the Undo / Redo buttons or Ctrl-Z / Ctrl-Y shortcuts, which are overridden while the AP editor dialog is open. Note that the undo history is lost when the AP editor is closed.
Registrierung
When you are happy with the APs you can return to the Registration tab and click Go Register. This can be an intensive process if the sequence is large, so now may be a good time to make a cup of tea. Registration will produce a 'sidecar' - a data file describing the APs, quality and local shifts - which will be used during stacking.
If you have altered the initial auto-placed APs then registration will automatically redo the analysis stage to account for the updated APs.
When this is complete the View Shifts button will be sensitive.
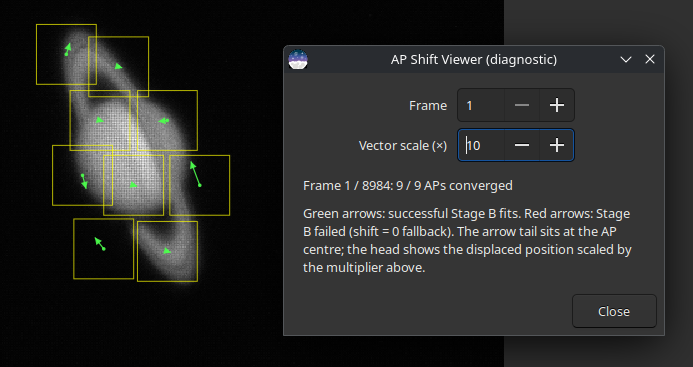
This tool allows you to view the per-AP, per-frame shifts computed relative to the reference frame. Successfully computed shifts are shown as a green arrow; if it was not possible to compute the shift for an AP it is shown with a red dot. By default such an AP is treated as having zero shift (the coarse global estimate) for stacking purposes; enabling Skip failed AP shifts in the Stacking tab instead drops these failed contributions, which can remove ghosting at the cost of fewer frames contributing there. The Frame widget allows stepping through frames in the sequence, and the Vector scale (x) widget allows multiplying the length of the shift visualization arrows, which may help with visualizing small shifts.
Frame Culling
There are two ways to limit the frames that contribute to stacking: global frame culling and per-AP culling. Each is described below: generally, per-AP culling is recommended as even mostly bad frames may contain areas of higher quality.
Global frame culling is achieved in the usual way: at any stage you can deselect frames using the frame browser or the Plot tab, and then select selected frames only in the Image Selection dropdowns in the Registration or Stacking tabs. This may occasionally be useful to deselect completely unusable frames, such as ones with USB transmission defects or aeroplane fly-throughs where the frame-to-frame global shift cannot be computed.
Per-AP frame culling has already been described above. The Registration tab sets a Register percent (the upper bound of frames ranked per AP) and the Stacking tab sets a Stack percent (the frames actually blended per AP). The latter is capped by the former: you may wish to register 100% of frames per AP but then reduce the stack percent in the stacking tab - this way round is fine, but you cannot increase the stack percent in the stacking tab beyond the register percent you set when registering the sequence without re-registering.
Multi-Point Stacking
This method is specifically intended for use with the multi-point registration method and will not work without a valid multi-point sidecar. The method is selected in the Stacking methods dropdown in the Stacking tab. If a sequence has a valid multipoint sidecar, multi-point stacking will automatically be proposed as the default stacking method when accessing the Stacking tab.
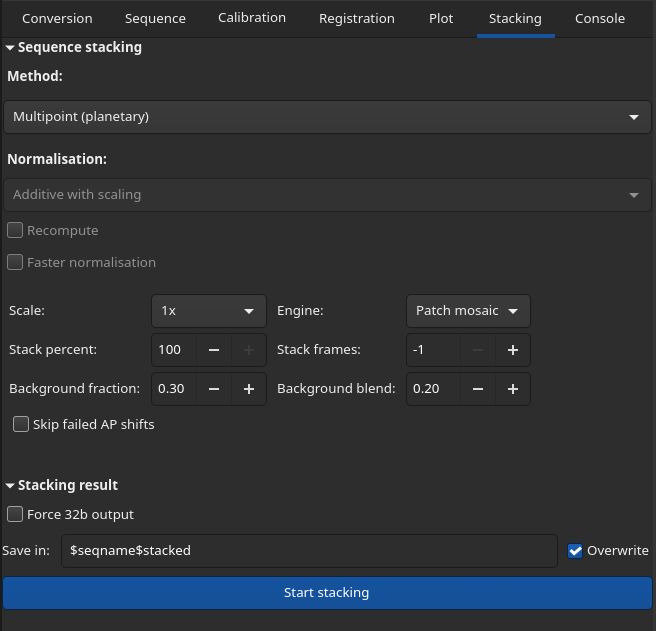
Stacking parameters
Normalization methods do not apply to multi-point stacking, and the relevant widgets are not sensitive when this stacking method is selected.
Scale: This dropdown sets the scale of the stack, with the choices 1x, 1.5x, 2x and 3x. When a value greater than 1x is selected each frame is upscaled using OpenCV interpolation before contribution to the upscaled stack buffer. This is similar to the old "Simplified Drizzle" method provided for deep-sky stacking.
Engine: This dropdown selects the stacking engine.
Patch (the default) is the classic method: each alignment point produces a small patch, and the patches are nudged into place by their measured local shifts and blended together where they overlap.
Warp is an experimental alternative. Instead of assembling patches, it interpolates the per-AP shifts into a single smooth distortion field and resamples each frame exactly once through it, so there are no patch boundaries or blending seams at all. On some targets it produces a slightly crisper, cleaner result; it takes a little longer. Because a warped frame has no per-patch success flag, the Skip failed AP shifts option does not apply and is greyed out when this engine is selected.
Stack percent: sets the percentage of the best frames to blend per AP. This is capped by the Register percent set in the Registration tab: you cannot stack more frames than were registered without re-running registration.
Stack frames: sets an absolute number of the best frames per AP to stack. If -1 this is ignored; if positive, this overrides Stack percent (still capped at what was registered).
Background fraction: Decides full-frame vs patch-based background composition.
Background blend: Controls the soft fg/bg blend ramp.
Skip failed AP shifts: When enabled, (frame, AP) contributions whose local shift measurement failed are dropped instead of being stacked at the coarse global estimate. This helps when ghosted or doubled patches appear in the stack. APs for which no frame produced a successful measurement are still stacked unfiltered (a misaligned patch is better than a hole). The default is off.
Force 32b output: When enabled, the final stacked image is saved as 32-bit float even if the input frames are 16-bit. The weighted merge is always performed internally in 32-bit float; this option only controls whether the saved result is packed down to 16-bit integer (the default) or kept at full float precision. The default is off.
Image rejection: This provides global culling control. For multipoint- registered sequences, the all, selected and quality options may be selected.
Once the desired parameters are set, click Start stacking to generate the stacked image.
Wie es funktioniert
Theorie
When you image a planet or the Moon through the atmosphere, turbulence ("seeing") smears the light in a way that changes from moment to moment and from place to place across the frame. At any given instant one region of the disc may be crisp while another is blurred, and a fraction of a second later the situation is reversed. Ordinary stacking aligns and averages whole frames, so it can only ever capture the moments when the entire field happened to be sharp - which is rare. Multi-point stacking instead treats many small regions of the image independently, so each region can be aligned and built from the particular frames in which it was sharpest. This is the same idea used by dedicated planetary stackers such as AutoStakkert! and PlanetarySystemStacker (PSS); this implementation is based on the latter.
The pipeline runs in three stages, which appear in the log as Stage A, Stage B
and Stage C. Stages A and B together make up registration: the Analyze
button runs Stage A on its own (so you can review and edit the alignment points and see
the reference frame before committing to the heavier work), while Go Register
runs Stages A and B and writes the sidecar. Stage C is the stacking step, run from the
Stacking tab. The mpp command runs all three in one go.
Quality ranking (Stage A). Every frame is scored for sharpness. Siril measures local contrast using a Laplacian (an edge-detecting filter): a sharp frame has strong, well-defined detail and therefore a high score, while a blurred frame scores low. The Brightness-normalise quality option divides this score by the frame's brightness so that passing clouds or changing transparency do not masquerade as changes in sharpness.
Global alignment (Stage A). The atmosphere and small mount errors make the target wander around the frame, so Siril first removes this gross, whole-frame motion. In Planet (disc) mode it tracks the brightness centroid of the disc; in Surface (detail) mode it locks onto an automatically chosen patch of surface detail and follows it by cross-correlation. The best few percent of frames (see Reference frame %) are then averaged together to build a clean, low-noise reference frame that the rest of the process measures against.
Alignment points (Stage A). A grid of small alignment points (APs) is laid over the reference frame. Each AP is a little box anchored on a piece of detail. Points that fall on dark sky, flat low-contrast areas or featureless regions are discarded (this is what the Min brightness, Min contrast and Min structure thresholds control), because there is nothing there to align to. You can also adjust this grid by hand in the AP editor.
Local per-AP shifts (Stage B). This is the heart of the method, and the step that Go Register adds on top of Stage A. For every alignment point and every frame, Siril searches a small neighbourhood around the point to find where that patch of detail has drifted to in that particular frame. The result is a dense map of tiny, local shifts that describes how the seeing warped each frame differently in each region - something a single global alignment cannot represent. Stage B also scores each frame's quality separately at each alignment point, so the stack can later pick the best frames region by region. The search radius is set by AP search width, and the per-point shifts can be inspected with the shift viewer. All of this is saved to the sidecar so it can be reused at stacking time without recomputing.
Sharpening the measurement (Stage B). Two refinements, both on by default, improve the accuracy of these local shifts (see Advanced settings). First, once a full set of shifts has been measured against the (somewhat soft) reference frame, Siril stacks the sharpest frames at each alignment point to build a much sharper local reference and measures every shift again against it - a single measurement is only as good as the reference it is compared to. Second, because the raw per-AP shifts are noisier than the true warp - which itself varies smoothly from point to point - a robust local fit across neighbouring alignment points removes most of that measurement noise without flattening genuine warp. The grid spacing of the alignment points can also be made denser than the correlation-box size to sample that warp field more finely.
Stacking (Stage C). Finally the image is rebuilt region by region. For each alignment point Siril keeps only its sharpest frames (Stack percent / Stack frames), using the per-AP quality scores from Stage B, nudges each patch into place using its measured local shift, and averages them. Neighbouring patches overlap and are blended together where they meet; areas not covered by any AP are filled from a separately composed background. The averaging is carried out in floating point for precision and the result is written out at the chosen bit depth. The measures that keep these overlapping patches from showing as a grid are described next.
Keeping the patchwork invisible (Stage C). Rebuilding an image from hundreds of small, independently chosen patches risks leaving the alignment-point grid visible as blocks, seams or shading steps. Several measures guard against this:
Soft frame selection. Rather than a hard cut at the chosen percentage, frames whose quality falls near the cutoff are faded out with a smooth (raised-cosine) weight instead of being dropped abruptly. The width of this fade adapts to how much a frame's quality ranking wobbles between neighbouring points, so a borderline frame contributes almost equally to adjacent APs - it cannot be used in one patch but not its neighbour and so print the grid. (At 100 % per-AP selection, or when an exact Stack frames count is requested, no taper is applied.)
Feathered (Hann) blending. Each patch is blended into the mosaic through a smooth raised-cosine window that fades to nothing at its edges, so overlapping patches cross-fade seamlessly with no hard boundary or crease at the joins.
Sub-pixel placement. Patches are shifted into position to a fraction of a pixel rather than snapped to the nearest whole pixel, avoiding a jagged, aliased look and a small fixed-pattern bias.
Brightness matching. Each frame is first scaled to a common brightness so that transparency changes do not show, and neighbouring patches - which average different sets of frames - have their levels equalised over the region they share, removing the faint block-shading that those level differences would otherwise leave behind.
The Skip failed AP shifts option (see above) is a further safeguard, discarding patch contributions whose local alignment could not be measured rather than letting them blur or ghost the result.
An alternative reconstruction: the warp engine. The patch-based reconstruction above is the default, but Stage C offers a second, experimental engine (Engine on the Stacking tab). Rather than assembling and blending patches, the Warp engine interpolates the per-AP shifts into one smooth distortion field and resamples each frame exactly once through it. There are then no patch boundaries, and none of the invisibility measures above are needed because there is no patchwork to hide. It can give a slightly crisper, cleaner result on some targets, at a little more compute.
The pay-off is an image that is sharper and less noisy than any single frame, because every part of it is assembled from the brief moments of good seeing local to that part.
Siril Kommandozeile
mpp seqname [-out=file] [-scale=N (1.0..3.0)] [-stack-percent=N] [-stack-frames=N] [-bg-fraction=F] [-bg-blend=F] [-skip-failed-aps] [-engine={patch|warp}] [-debayer={rcd|bilinear|vng|ahd|amaze|dcb|hphd|igv|lmmse}] [-align={planet|surface}] [-half-box=N] [-search-width=N] [-search-global=N] [-register-percent=N] [-ref-percent=N] [-fast-changing] [-min-brightness=N] [-min-contrast=N] [-min-structure=F] [-no-shifts] [-no-normalize] [-no-float-rank] [-noseed] [-zero-mean] [-no-refine] [-refine-frames=N] [-ap-step=N] [-shift-smooth=F] [-avi-bayer={auto|none|rggb|bggr|gbrg|grbg}]
Siril Kommandozeile
register_mpp seqname [-align={planet|surface}] [-half-box=N] [-search-width=N] [-search-global=N]
register_mpp seqname ... [-register-percent=N] [-ref-percent=N] [-fast-changing] [-min-brightness=N]
register_mpp seqname ... [-min-contrast=N] [-min-structure=F] [-no-shifts] [-no-normalize] [-no-float-rank] [-noseed]
register_mpp seqname ... [-zero-mean] [-no-refine] [-refine-frames=N] [-ap-step=N] [-shift-smooth=F]
register_mpp seqname ... [-avi-bayer={auto|none|rggb|bggr|gbrg|grbg}]
Siril Kommandozeile
stack_mpp seqname [-out=file] [-scale=N (1.0..3.0)] [-stack-percent=N] [-stack-frames=N] [-bg-fraction=F] [-bg-blend=F] [-skip-failed-aps] [-engine={patch|warp}] [-debayer={rcd|bilinear|vng|ahd|amaze|dcb|hphd|igv|lmmse}]