Быстрая фотометрия
Photometry areas explained
As Siril only performs aperture photometry, it's important to understand and set the correct parameters.
The stars are modeled according to your choice: Gaussian or Moffat as decribed here in the Dynamic PSF chapter.
So a particular star on a particular image has its own FWHM.
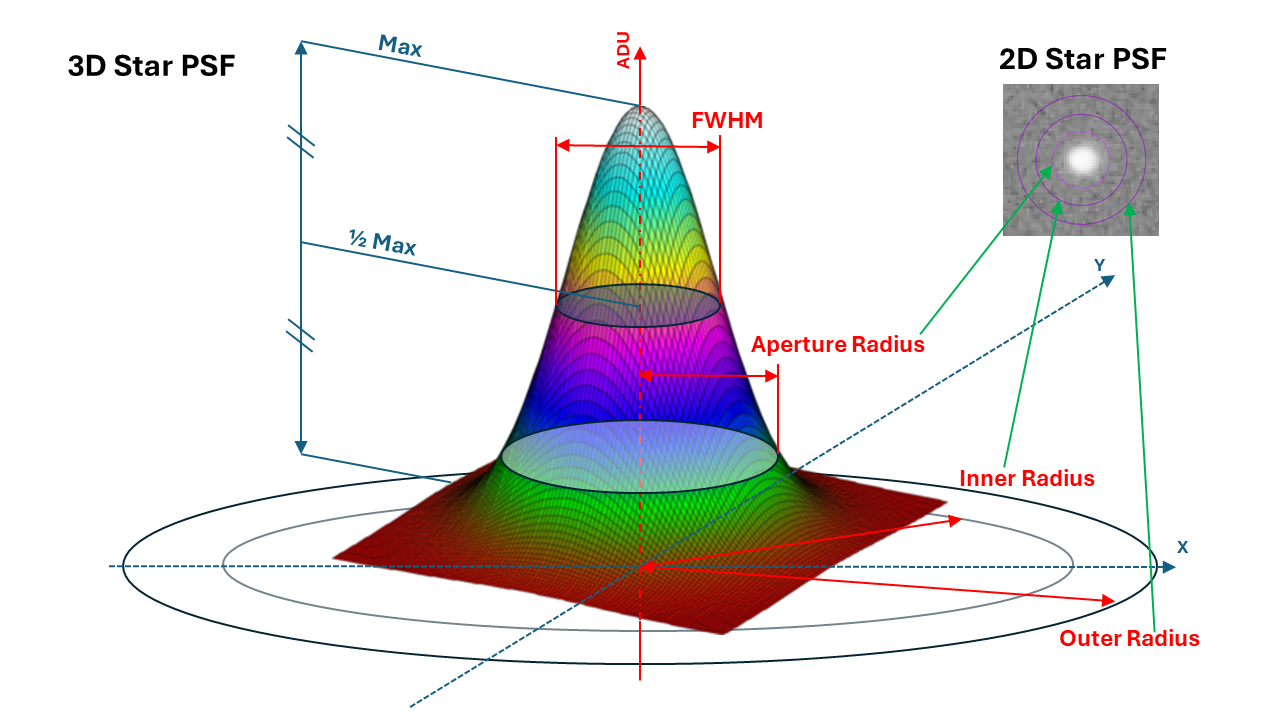
PSF and photometry terms.
The aperture photometry process needs 3 radii:
The outer circle, defined by the outer radius (most often expressed in pixel).
The inner circle, defined by the inner radius (most often expressed in pixel). These 2 circles define the annulus which is used to measure the background (that is the sky level + additionnal noise).
The aperture circle, defined by the aperture radius. It can be expressed in pixel or as a ratio of the star FWHM (the automatic checkbox in the window). This area is used to measure the star signal added to a backgroud signal.
These 3 radii can be set and tweaked individually from the GUI tab.
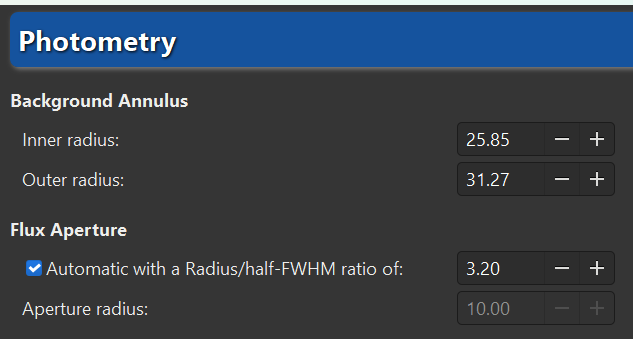
Radii settings.
Or via the command line interface:
Командная строка Siril
setphot [-inner=20] [-outer=30] [-aperture=10] [-dyn_ratio=4.0] [-gain=2.3] [-min_val=0] [-max_val=60000]
Совет
These radii settings apply to all aperture photometric processes: quick photometry and Light Curves. Check them carfully.
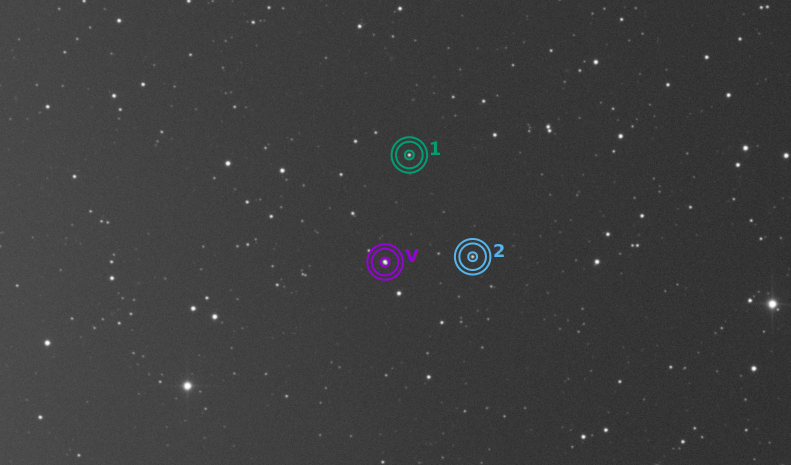
Фотометрия выбранных вручную объектов на одиночном снимке
Кнопка Быстрая фотометрия  расположена на панели инструментов и используется для выполнения фотометрии звезд. Как правило, это самый простой способ выполнить фотометрию.
Совет
Если звезда находится в между нескольких звезд и инструмент не может указать на нужную звезду, альтернативным решением является выделить область вокруг звезды, а затем щёлкнуть правой кнопкой мыши и выбрать PSF. Также может быть интересно узнать, что Ctrl-щелчок средней кнопкой мыши (или Cmd-щелчок средней кнопкой мыши на MacOS) выделяет область рекомендуемого размера для PSF/фотометрии (на основе настроенного внешнего радиуса).
Совет
При выполнении фотометрии на RGB изображении результаты фактически рассчитываются для зеленого слоя. Чтобы получить фотометрию для красного или синего слоя, необходимо работать на соответствующих каналах.
Командная строка Siril
psf [channel]
Нажмите на эту кнопку, чтобы изменить режим выбора области изображения, затем нажмите на звезду. Вычисляются фотометрические параметры и PSF (функция рассеяния точки) звезды, что дает множество деталей.
Для расчета PSF используются две модели, которые пользователь может выбрать в окне Динамическая PSF <Dynamic-PSF:Dynamic PSF> (:kbd:`Ctrl + F6).
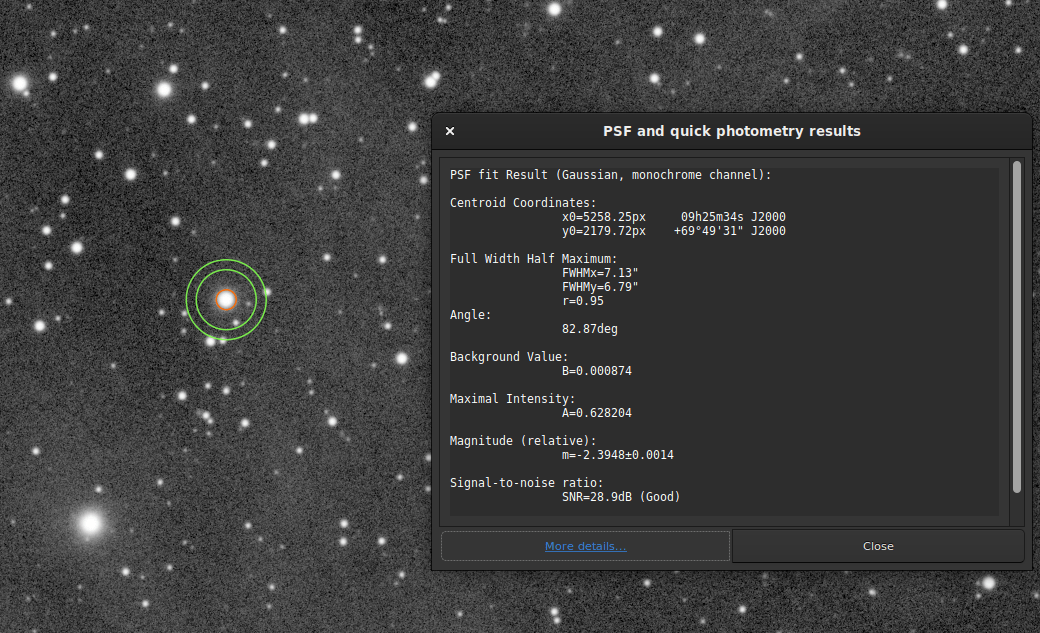
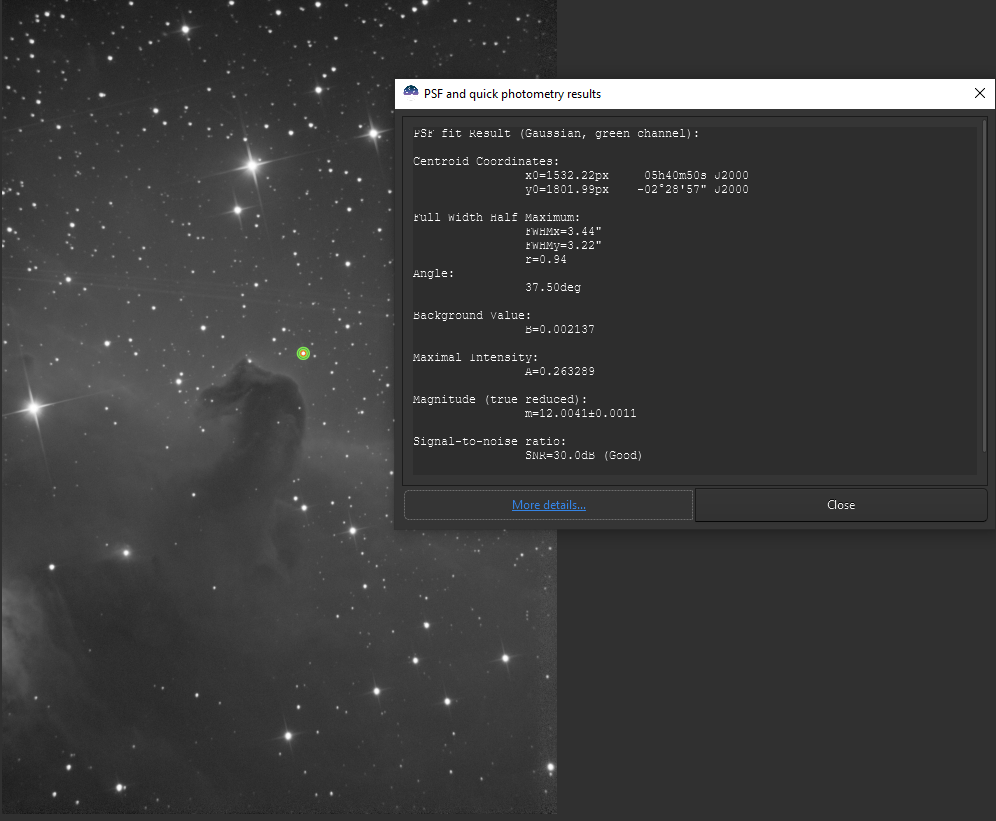
Окно результата фотометрии.
Результат фотометрии и связанная с ним PSF отображаются в виде:
PSF fit Result (Gaussian, monochrome channel):

Centroid Coordinates:
            x0=5258.25px     09h25m34s J2000
            y0=2179.72px    +69°49'31" J2000

Full Width Half Maximum:
            FWHMx=7.13"
            FWHMy=6.79"
            r=0.95
Angle:
            82.87deg

Background Value:
            B=0.000874

Maximal Intensity:
            A=0.628204

Magnitude (relative):
            m=-2.3948±0.0014

Signal-to-noise ratio:
            SNR=28.9dB (Good)

RMSE:
            RMSE=1.890e-03
Подгонка была выполнена с помощью функции Гаусса, поэтому никаких дополнительных параметров не требуется. Однако, если использовался метод Моффата, будет показан следующий результат:
PSF fit Result (Moffat, beta=2.9, monochrome channel):
Координаты центроида дают координаты центроида в пикселях. Однако, как и в примере выше, если на изображении была установлена астрометрия, Siril дает координаты в Системе мировых координат (WCS) (RA и Dec).
Полуширина (FWHM) возвращается в угловых секундах, если масштаб изображения известен (получен из его заголовка или из GUI ), если не известен, то в пикселях. Округлость r также вычисляется как отношение \(\frac{\text{FWHMy}}{\text{FWHMx}}\).
Угол — угол поворота оси X относительно координат центроида. Лежит в диапазоне \([-90°,+90°]\).
Значение фона — это локальный фон в диапазоне \([0,1]\) для 32-битных изображений и \([0,65535]\) для 16-битных изображений. Это подобранное значение, а не фон, вычисленный в кольце апертурной фотометрии.
Макс. интенсивность также является подогнанным значением и представляет амплитуду. Это максимальное значение функции подгонки, расположенное в координатах центроида.
The magnitude, given with its uncertainty, is the result of photometry. However, if for some reasons the calculation cannot be done (saturated pixels or black pixels), an uncertainty of 9.999 is given. In this case, the photometry is flagged as invalid but a magnitude value is still given, although it should be used with caution. Here magnitude is uncalibrated, show with the (relative) keyword, see the next section for absolute magnitude calibration.
В результатах приведена оценка отношения Сигнал/шум. Его значение рассчитывается по следующей формуле и указывается в `дБ <https://ru.wikipedia.org/wiki/%D0%94%D0%B5%D1%86%D0%B8%D0%B1%D0%B5%D0%BB>"_:
(1)\[ \text{SNR} = 10 \log_{10}\left(\frac{I}{N}\right)\]где I — чистая интенсивность, пропорциональная наблюдаемому потоку F, а N — сумма неопределенностей, выраженная в (18).
Для простоты понимания он связан с 6 уровнями качества:
Отлично (сигнал/шум > 40 дБ)
Хорошо (сигнал/шум > 25 дБ)
Удовлетворительно (сигнал/шум > 15 дБ)
Мало (сигнал/шум > 10 дБ)
Плохо (сигнал/шум > 0 дБ)
Н/Д
Последнее обозначение отображается, только если вычисление не удалось по той или иной причине.
Наконец, RMSE дает оценку качества подгонки. Чем ниже значение, тем лучше результат.
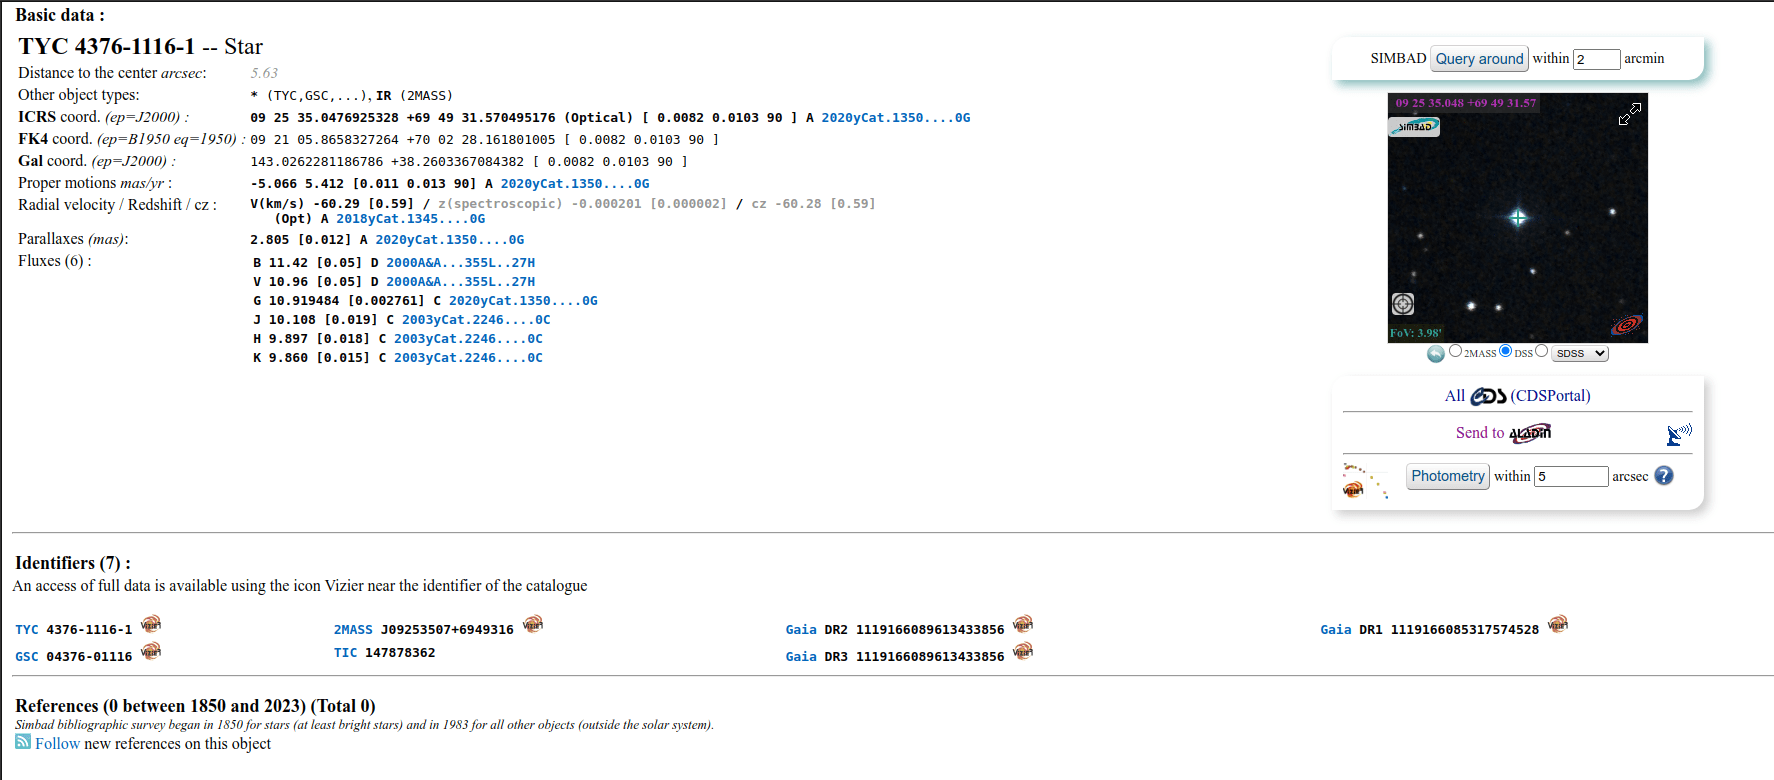
Когда изображение имеет астрономическое решение, кнопка Подробнее в нижней части окна ведет на страницу на сайте SIMBAD с информацией о выбранной звезде. Однако возможно, что страница не даст никакой дополнительной информации, если звезда отсутствует в базе данных SIMBAD.
Больше информации об анализируемой звезде. Нажмите на картинку, чтобы увеличить.
Быстрая фотометрия для последовательностей
Также можно выполнить быструю фотометрию для последовательности. Обычно это делается для получения кривой блеска, как описано здесь. Чтобы это сделать, вы должны ** загрузить последовательность , выделить звезду, затем **щелкнуть правой кнопкой мыши на изображении.
Совет
В идеале последовательность должна быть выровнена без интерполяции, чтобы не изменять исходные данные. Например, используйте алгоритм Всё звёздное небо с включенной опцией Только сохранить преобразования в файл seq.
Примечание
Убедитесь, что внутренний и внешний радиусы фонового кольца подходят анализируемой звезде и последовательности. Некоторые изображения могут иметь гораздо большую FWHM, чем эталонное изображение, из-за условий неба или плохого отслеживания. Их можно изменить в настройках или с помощью команды setphot.
В конце процесса Siril автоматически откроет вкладку График, на которой будут показаны рассчитанные кривые. Можно щёлкнуть по нескольким звёздами, чтобы повторить вычисления, однако первая звезда сохраняет особый статус переменной, а остальные служат в качестве опорных. Это важно при расчёте кривой блеска.
В этом примере были проанализированы 3 звезды. Первая из них используется как переменная. Остальные являются опорными.
Вычисление истинных звёздных величин
By default, calculated magnitudes are uncalibrated and only meaningful if compared to others in the linear image. The value given does not correspond at all to the true apparent magnitude of the object, also called relative magnitude.
Siril provides two tools that can be used to calibrate image magnitudes, which then enable magnitude computation to give apparent magnitudes: manual calibration on a single star or automated calibration using stars from a catalogue. In both cases it is important to calibrate the images first, with flats in particular, or magnitudes measured in different areas of images may not translate to the same equivalent apparent magnitudes in reality. Gradients will cause the same problem.
Manual calibration, single star
This technique requires selecting another star from the image as reference for apparent magnitude. The star is selected manually, with a selection drawn around it and its catalogue magnitude is given for the corresponding imaging filter.
Because it uses a single star, the results will be approximate because of the variations a single star can have in magnitude across several images, caused by various noise sources. For a greater precision, the reference star should be chosen of similar color and magnitude as the star(s) you want to measure. Catalogues contain magnitudes computed using a photometric filters, which is generally not what amateurs use to make nice pictures, this adds another approximation.
Do a quick photometry on a known star, the given relative magnitude is
-2.428. It is possible to find out the actual visible magnitude by clicking on the More details button as explained above. Let's say the value found is11.68(make sure you use a value corresponding to the spectral band of the image, or V (for visual) for general purpose magnitudes).После этого оставьте звезду выделенной, затем введите следующую команду в Siril
setmag 11.68
Это выведет что-то вроде
10:50:49: Relative magnitude: -2.428, True reduced magnitude: 11.680, Offset: 14.108
Командная строка Siril
setmag magnitude
Калибрует звёздную величину, выбирая звезду и задавая известную видимую звёздную величину.После этого все вычисления PSF будут возвращать откалиброванную видимую звёздную величину вместо видимой величины относительно значений ADU. Следует отметить, что для того, чтобы быть осмысленным, указанное значение звёздной величины должно совпадать с наблюдательным фильтром.Чтобы сбросить константу звёздной величины см. UNSETMAGNow, all calculated magnitudes must have values close to their true visual magnitude. It will remain set as long as Siril is running, so it will have to be done again next time it is started.
Окно результатов фотометрии с установленной истинной звездной величиной.
Чтобы сбросить вычисленное смещение, просто введите
unsetmag
Совет
Для последовательностей существуют такие же команды. Это seqsetmag и sequnsetmag. Они используются таким же образом, когда загружена последовательность.
Командная строка Siril
seqsetmag magnitude
Командная строка Siril
sequnsetmag
Automated calibration, many stars
The new technique introduced in Siril 1.5 uses all stars from catalogue that appear in the image and for which photometric analysis succeeded with a signal to noise ratio above 3. The selected catalogue will be the local astrometric Gaia DR3 catalogue if available (installation recommended), if not the local Tycho2 + NOMAD catalogue (from KStars) if available, if not then the remote Gaia DR3 catalogue is used.
It is possible to only select stars of similar colour as the target in the computation to have a more reliable magnitude calibration. This is mostly useful if no photometric filter is used. In those conditions, red and blue stars will not appear with the same apparent magnitude as given in catalogues because of the slope of their spectrum over the visible spectrum and the response of the imaging system.
A prerequisite to the use of this tool is to plate solve the image.
It is available through the Tools menu, Photometry section, Calibrate magnitudes ... entry.

Automated magnitude calibration tool window.
Star filtering can be done using their black body equivalent temperature and the allowed range. The local astrometric Gaia DR3 catalogue does not contain much photometric data but it still has some magnitude information and temperature of the star (compared to the photometric one that contains spectral data). We can use it for this photometric scenario. In case Tycho2 + NOMAD catalogues are used, the temperature is automatically converted to a B-V value using the formula from Ballesteros 2012. This is also available as a command as shown below.
Командная строка Siril
catmag [reftemp] [dtemp]Computes the abolute magnitude reference using by order or preference the local Gaia catalog, the local NOMAD catalog or the remote Gaia catalog, using a single channel (green for color images). Stars used for the calibration can be filtered by color, using a reference temperature (reftemp) and a range (dtemp) if Gaia is used, automatically converted to B-V values if NOMAD is used. This filtering should be chosen to match the filter used for capture. The computed offset value is global, for all images until siril is restarted. See also SETMAG for manual operation and UNSETMAG to reset it