Preferences (GUI)
Preferences are accessible from the Burger menu  or with the
shortcut Ctrl + P. There are 10 pages and each page representing a theme.
The preferences allow more or less advanced users to optimize Siril to best
suit their needs. Some settings can have a negative impact on Siril's
performance, so it is advisable to change the settings only when you know what
you are doing. There are three buttons at the bottom of the preferences dialog
box. Reset restores all settings to the default value, Cancel
cancels the current changes and Apply will close the dialog box and
save the settings.
or with the
shortcut Ctrl + P. There are 10 pages and each page representing a theme.
The preferences allow more or less advanced users to optimize Siril to best
suit their needs. Some settings can have a negative impact on Siril's
performance, so it is advisable to change the settings only when you know what
you are doing. There are three buttons at the bottom of the preferences dialog
box. Reset restores all settings to the default value, Cancel
cancels the current changes and Apply will close the dialog box and
save the settings.
FITS/SER debayer
Page 1 of preferences dialog
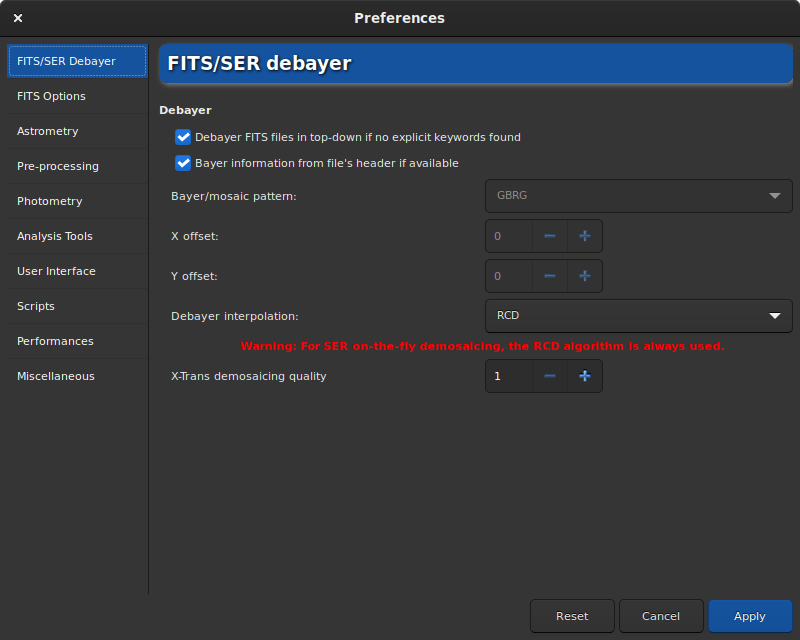
The FITS/SER debayer tab allows the user to define the debayer settings for FITS, SER or TIFF files. Consequently, this tab is only usable for a user with an OSC camera. It is advisable to leave the default settings as Siril will automatically define the correct settings to use. However, in the case of a TIFF file that is not an AstroTIFF, or a file that does not have all the required keywords, it may be necessary to adjust the settings manually.
Row-order preference: You can choose to use header ROW-ORDER keywword if present and fallback to either Top-Down or Bottom-Up if not present. Or you can force a preferred orientation. More explanation on this keyword can be found here.
Bayer/mosaic pattern: This drop-down menu allows you to choose the type of Bayer matrix used by the camera. It is generally indicated in the manufacturer's information. If Bayer information from file's header if available is ticked, the value specified in this dropdown will only be used in case the information is not present in the header. If the option is unticked, it is always used.
X offset: In rare cases, files are recorded with a Bayer array shift. We can define an offset of 1 on the X axis, and an offset of 1 on the Y axis. Here the value defines if there is an offset in X. Note that this is used only when Bayer information from file's header if available is unticked or when the header does not contain this information.
Y offset: Y offset of Bayer array.
Changing these settings will involve a different demosaicing each time. That's why it is strongly advised to leave the settings in their default state, unless you are really sure of what you are doing.
Another option that has less impact on the final result is the choice of the demosaicing algorithm proposed in Debayer interpolation. The choices are the following:
Fast Debayer is the fastest algorithm available in Siril. However, other algorithms listed below are often quite better.
VNG4, Threshold-Based Variable Number of Gradients, works on a 5x5 pixel neighborhood around each source pixel. It is a very good algorithm for flat areas of the image (like sky background) but produces artifacts in high contrast areas (like stars).
AHD, Adaptive Homogeneity-Directed, is another well known debayer algorithm. However it usually shows artefacts in the background and bad star shapes.
AMaZE, Aliasing Minimization and Zipper Elimination, is an algorithm that gives good results specially on low noise captures.
DCB, Double Corrected Bilinear, a more recent algorithm, can show some artifacts in the background like AHD.
HPHD, Heterogeneity-Projection Hard-Decision, is an old algorithm giving some nice results but that is quite slow.
IGV and LMMSE are very good when working with very noisy images. However, IGV tends to lose some chromatic information, while LMMSE is one of the most computational expensive demosaicers and needs a lot of memory.
RCD, Ratio Corrected Demosaicing, intends to smooth the colour correction errors that are common in many other interpolation methods. It does an excellent job for round edges, for example stars, and is therefore the default algorithm used in Siril.
For the X-Trans sensor, a special algorithm called Markesteijn is used regardless of the method selected in the preferences. For the latter, it is possible to define the requested quality with the X-Trans demosaicing quality option. It defines the number of passes for the X-Trans Markesteijn demosaicing algorithm, 1 is the default, 3 may be slightly better but slower.
Warning
For on-the-fly demosaicing of SER files, the RCD algorithm is always used regardless of the choice made in the drop-down menu. This allows Siril to be more efficient in terms of execution speed and to offer a good quality.
FITS Options
Page 2 of preferences dialog
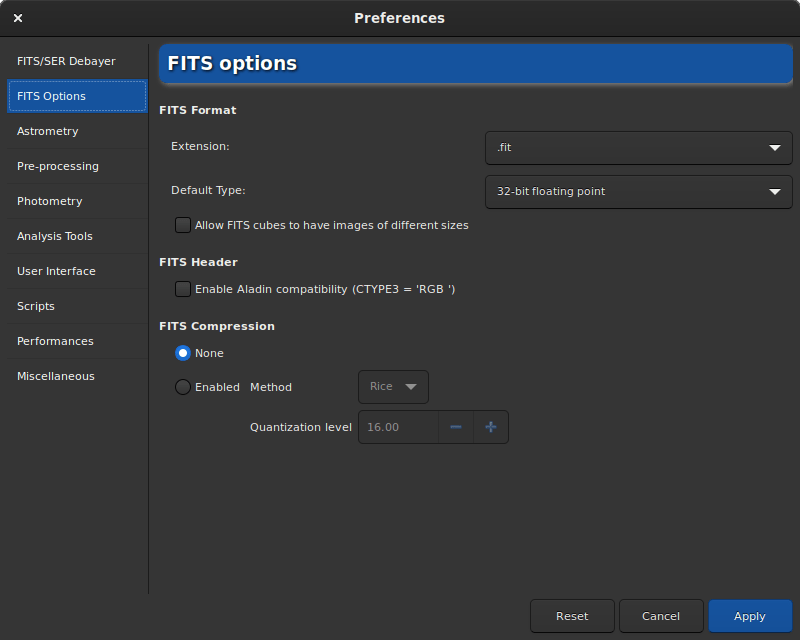
The FITS Options page groups all the settings related to the native format used by Siril.
FITS extension: By default, the value is set to .fit However, many capture programs use the .fits extension. In this case we advise you to update the value. All files created by Siril will have the extension defined here. Moreover, only sequences with the extension defined in the preferences can be loaded. It is therefore not possible to open a .fits sequence and a .fit sequence without updating this value. Supported extensions are:
.fit
.fits
.fts
All of them can be appended by the .fz extension if the files are compressed.
Siril command line
setext extension
Sets the extension used and recognized by sequences.The argument extension can be "fit", "fts" or "fits"Default Type: By default, Siril works in 32-bit floats in the range [0, 1]. This is the best way to keep a high precision. However, for hard disk space considerations a user may decide to work in 16-bit unsigned (in the range [0, 65535]). Be careful though, a 16-bit stacking can lose a lot of information.
Allow FITS cubes to have images of different sizes: This can be useful to open scientific FITS files that were not created by Siril and that contain multiple images of different dimensions, which would otherwise considered as invalid Siril FITSEQ files. The JWST images are a good example of the use of this option. An example is given here.
Enable Aladin compatibility (CTYPE3 = 'RGB '): Aladin considers a 3D FITS cube as a RGB image (Red, Blue and Green components) if the FITS keyword
CTYPE3 = 'RGB 'is specified in the header. In this case anyBITPIXvalue are supported. Without the FITS keywordCTYPE3 = 'RGB 'set, only FITS cube with 3 frames sharing the same dimension and with aBITPIX=8will be automatically detected as RGB FITS.
Warning
This option may conflict with the astrometry feature and should only be activated if it is really necessary.
Update pixel size of binned images: Used for image sampling computation, pixel size can be given in two different ways: the real pixel size is given but has to be multiplied by the binning (when checked), the already multiplied pixel size is given (when unchecked). It depends on the acquistion software used to create the FITS.
Embed ICC profiles in saved FITS files: This should generally be left on, unless you need interoperability with a program that fails to handle FITS with embedded ICC profiles (none are currently known).
Verify file checksums in FITS header (DATASUM and CHECKSUM): Verify file checksums if they exist. The verification occurs each time the file is read, which may significantly impact Siril's performance when using a sequence.
FITS compression: La compression peut être intéressante dans certains cas où l'espace sur le disque dur est un point clé du traitement. You can find more information in the section dedicated to the FITS format, here.
The compression adds the extension
.fzto the files created. Siril is able to open a sequence with the fz extension without having to change any value in the preferences.
Siril command line
setcompress 0/1 [-type=] [q]
Astrometry
Page 3 of preferences dialog
Tip
Don't forget that you can scroll the window as there are options at the bottom.
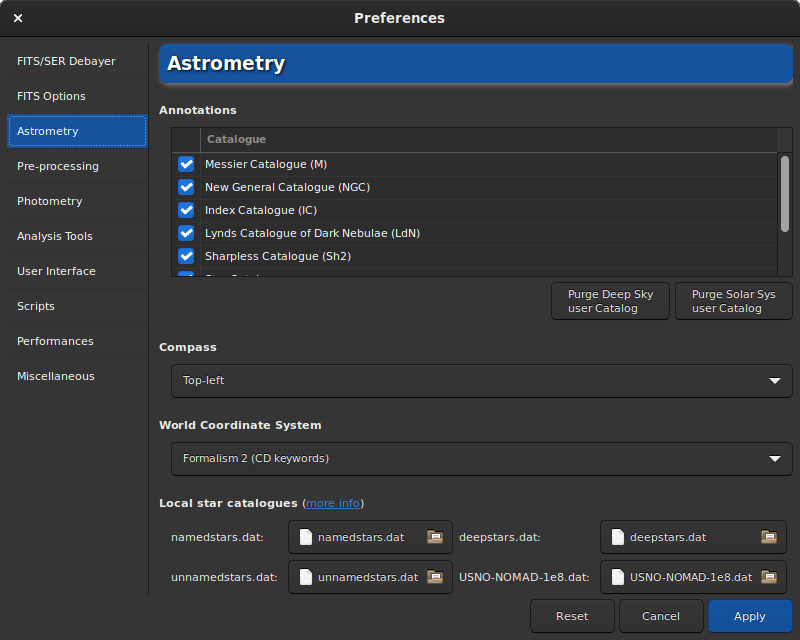
This tab contains all the options related to astrometry. Astrometry is a feature strongly implemented in Siril. When the image is solved (i.e. when the astrometry has been successful), it is possible to display the names of the known objects. In particular those listed in the large astronomical catalogs. The annotation part allows to define which catalogs can be used for the display of object names. Currently there are 8 of them, and they can be deselected to be ignored:
Messier catalog
New General Catalogue
Index Catalogue
Lynds' Catalogue of Bright Nebulae
Sharpless Catalogue
Catalogue of Brightest stars
IAU constellations lines
IAU constellations names (positions collected from this page)
In addition to this list, there are two more catalogs that are filled in by the user. One concerning the deep sky objects, the other concerning the solar system. They can be better described in the annotations section of this documentation.
Underneath the list of astronomical catalogues is an option to set a preferred IAU Observatory Code. This is a 3-character code that can be used to specify a nearby IAU observatory to improve location accuracy when running conesearch -cat=solsys. If the -obscode= option is not provided, this default is used in preference to the geocentric default which is used otherwise. The option text provides a hyperlink to the Minor Planets Center website which maintains an up-to-date list of the IAU observatory codes, so that you can easily find the closest code to your location.
By clicking on the button Show object names  (only if
the image has been plate-solved), the annotations are displayed on the image.
It is also possible to click on the button that displays the celestial grid
(only if
the image has been plate-solved), the annotations are displayed on the image.
It is also possible to click on the button that displays the celestial grid
 . The latter, by default, adds a compass to the center of the
image. The Compass section allows you to define the desired location for
the display of the compass.
. The latter, by default, adds a compass to the center of the
image. The Compass section allows you to define the desired location for
the display of the compass.
The World Coordinate System section allows you to choose
Formalism 1: In the
PC i_jformalism, the matrix elements \(m_{ij}\) (linear transformation matrix) are encoded inPC i_j(floating-valued) header cards, and si asCDELT i. The i and j indices are used without leading zeroes, e.g.PC 1_1andCDELT 1. The default values forPC i_jare 1.0 for \(i = j\) and 0.0 otherwise. ThePC i_jmatrix must not be singular; it must have an inverse. Furthermore, allCDELT imust be non-zero.Formalism 2: The
CD i_j(floating-valued) keywords encode the product \(s_i m_{ij}\). The i and j indices are used without leading zeroes, e.g.CD 1_1. TheCD i_jmatrix must not be singular; it must have an inverse.CDELT iandCROTA iare allowed to coexist withCD i_jas an aid to old FITS interpreters, but are to be ignored by new readers.
The Local star catalogues part of the dialog window concerns the use of local catalogs to platesolve images. This feature is described in details in the local star catalogues section of this documentation.
Under the General Platesolving section, a number of options are available to control both Siril internal solver and astrometry.net.

Bottom of page 3 of preferences dialog
the first option determines if the computed focal length and input pixel size are stored in the settings as default values for images that don't have the corresponding metadata, when an astrometric solution is found.
Sampling tolerance: percent below and above the expected sampling to allow. Given sampling is multiplied or divided by 1 + this / 100.
Degrees of the polynomial correction: solvers can use a polynomial correction (SIP) to work with optical aberrations, this is the order of the polynomial model. 0 disables it.
Target radius: allowed search radius around the target coordinates for the solve (degrees). Unused for blind (no target passed) solves.
Maximum seconds to try solving: allowed time for the solve for each catalog file. It can be used as the total solve time only if solve-field is configured to do so in its configuration file.
The last section is dedicated to the solve-field plate solver from the astrometry.net suite.
Do not delete .xyls: the list of stars is passed to solve-field as a FITS table, check this to keep the file in the working directory.
Do not delete .wcs: the results from solve-field are stored in a FITS header with a file name ending in .wcs. Check this to not remove this file.
Location of local astrometry.net solver: In order to use Astrometry.net locally in Siril, it can be necessary to tell to Siril the path where it is located. On UNIX-based systems, it is generally in the
PATHvariable and not necessary. For Windows, if you did not modify the default installation directory, that is %LOCALAPPDATA%\cygwin_ansvr, Siril will search for it without additional setup. If you have cygwin and have build astrometry.net from the sources, you must specify the location of cygwin root here.Show solve-field output: print the output of the solver in Siril's main log window, otherwise, only the outcome will be given.
Pre-processing
Page 4 of preferences dialog
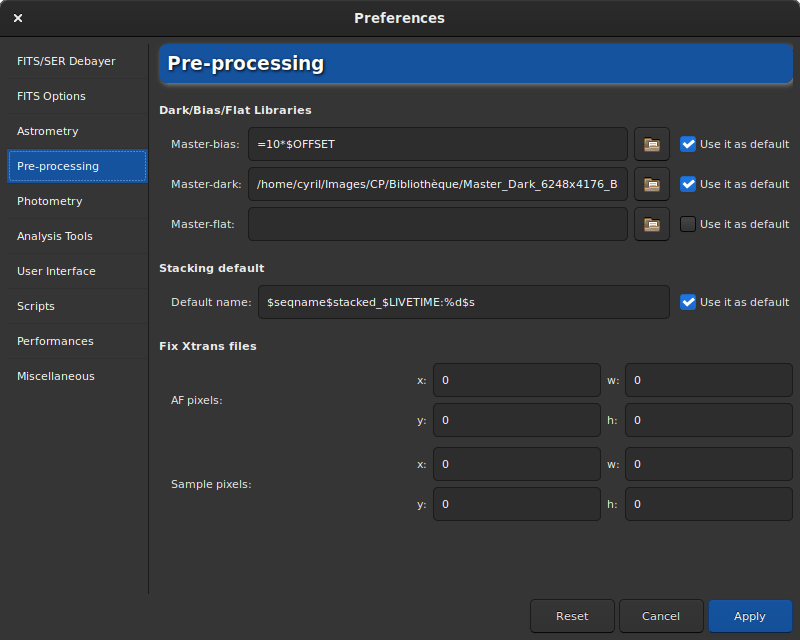
The pre-processing tab contains all the elements related to the steps that are executed until the stacking. Here it is possible to manage a library of offsets, darks, flats and distortions, the output name of the stacked file or specific corrections for cameras that use the X-Trans sensor.
Dark/Bias/Flat/distortion Libraries: In this section it is possible to load an offset, a dark and a flat that will be used by default in the pre-processing if the button to the right of the text box, Use it as default is checked. Each path will also be stored in the reserved keywords
$defbias,$defdark,$defflatand$defdisto(one token$) which can be used when saving a stacking/platesolving result. As far as bias is concerned, it is possible to use more than just a file path. Indeed, in the Siril team we encourage users to use synthetic bias as explained in this tutorial. Several values are then possible as long as the first character entered is the=sign. It is possible to use a fixed integer value like=500or a multiplication involving the keyword$OFFSET(one token$) as long as the latter is actually registered in the FITS file header, like10*$OFFSET. More details are given in the tutorial.Stacking default: Here we define the default name that we want to give to the stacking results. It is possible to use any value given in the FITS header as a keyword and surround it with
$tokens. If the keyword does not exist the variable will be used, otherwise it is its value. Another reserved keyword that can be used is$seqname$. It contains the name of the loaded sequence. For example, the following default name,$seqname$stacked_$LIVETIME:%d$swith a sequence namer_pp_light_and the following header:... DATE = '2022-12-08T22:21:14' / UTC date that FITS file was created DATE-OBS= '2015-08-21T22:18:25' / YYYY-MM-DDThh:mm:ss observation start, UT STACKCNT= 13 / Stack frames EXPTIME = 300. / Exposure time [s] LIVETIME= 3900. / Exposure time after deadtime correction EXPSTART= 2457256.42945602 / Exposure start time (standard Julian date) EXPEND = 2457256.51666667 / Exposure end time (standard Julian date) ...
will output r_pp_light_stacked_3900s.fit.
Note
Both library paths and stacking default support path parsing.
Fix Xtrans files: This setting field is very specific and only concerns possessors of certain X-Trans sensors. Indeed, some images from these cameras show a large square in the center of the darks and bias images due to the position of the autofocus (AF). Siril has an algorithm to eliminate it for the following cameras:
Fujifilm X-T1
Fujifilm X-T2
Fujifilm X-T20
Fujifilm X-Pro2
Fujifilm X-E3
Fujifilm X-H1
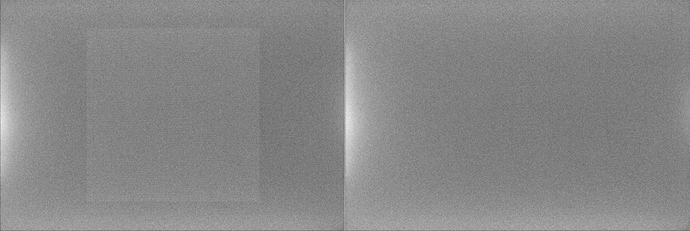
X-Trans artifact fixed by the algorithm of Siril
In the unlikely event that your camera contains this artifact and is not supported, then it is possible to define the correction to be applied here. The best thing to do is to contact the dev team in order to have the values to enter that would correspond to your camera.
Photometry
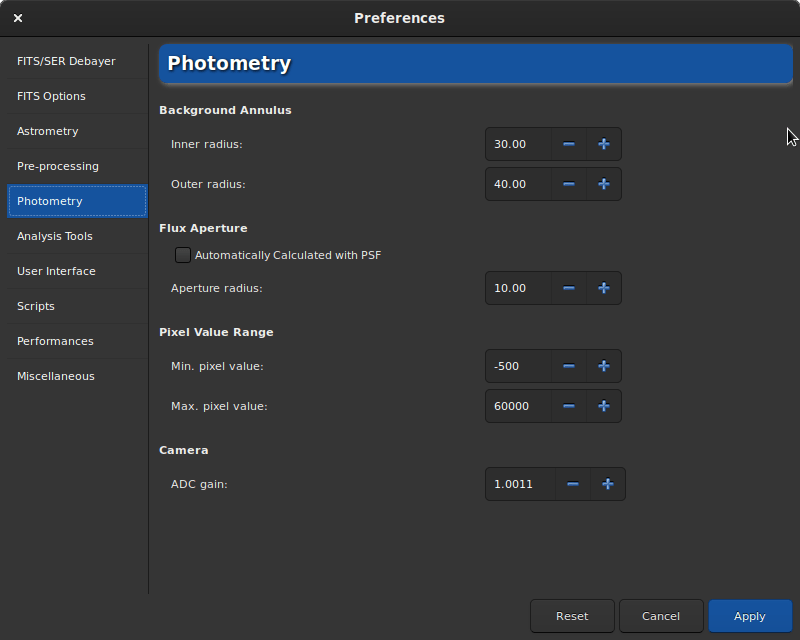
Page 5 of preferences dialog
Photometry, which is the study of light, is another feature very present in Siril. This section of the preferences allows you to define the settings associated with this tool.
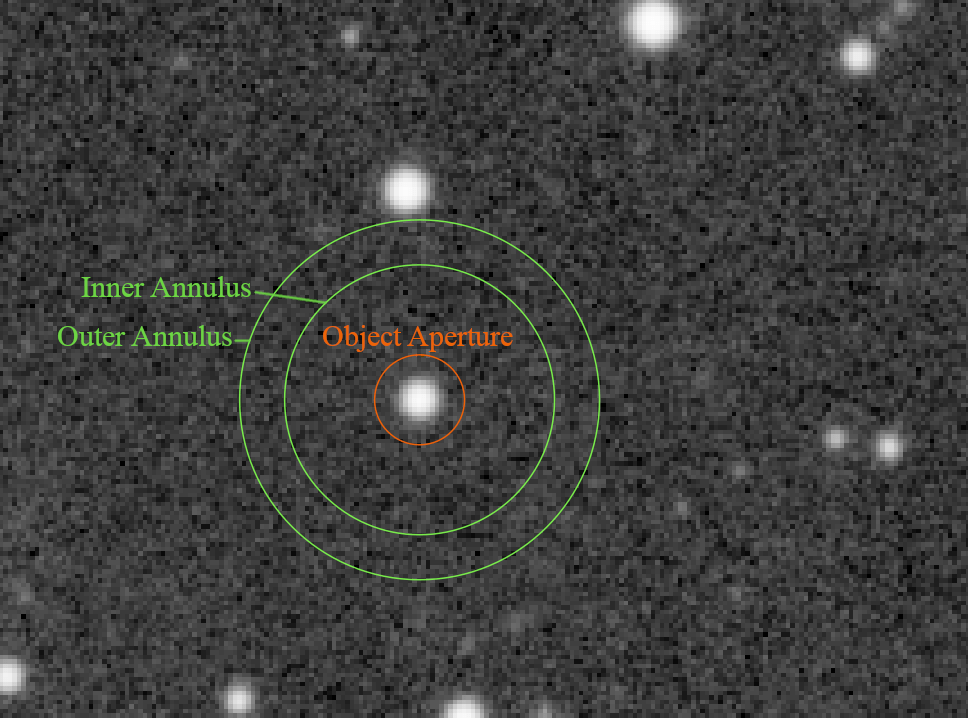
Circle of the aperture photometry
The basic principle of aperture photometry is to sum-up the observed flux in a given radius from the center of an object, then subtract the total contribution of the sky background in the same region (calculated in the ring between the inner and outer radius), leaving only the flux of the object to calculate an instrumental magnitude. This is described in more detail in the Photometry section of this documentation.
It is then possible to modify the inner radius and the outer radius to define a size that optimizes the calculated sky value, trying to avoid the stars inside the ring. Outer must always be greater than inner. By default, the flux aperture radius is set as twice the PSF's FWHM, however it is possible to disable this feature and define a fixed value manually.
Pixel range value allows users to set a limit for which the pixel is considered bad for photometry. Indeed, doing photometry on saturated data will never give good results, but even getting close to high values may not be suitable because it may be in the non-linear regime of sensors. A default value of 50000 ADU is set to avoid this region, but it may vary from sensor to sensor. Negative values are also allowed because noise can average around a positive value but still provide a few pixels with negative values.
Finally, if known, it is highly recommended to put the value of the A/D converter gain in electrons per ADU: it is used in the uncertainties computations, if not already provided in the headers of the processed images.
Analysis Tools
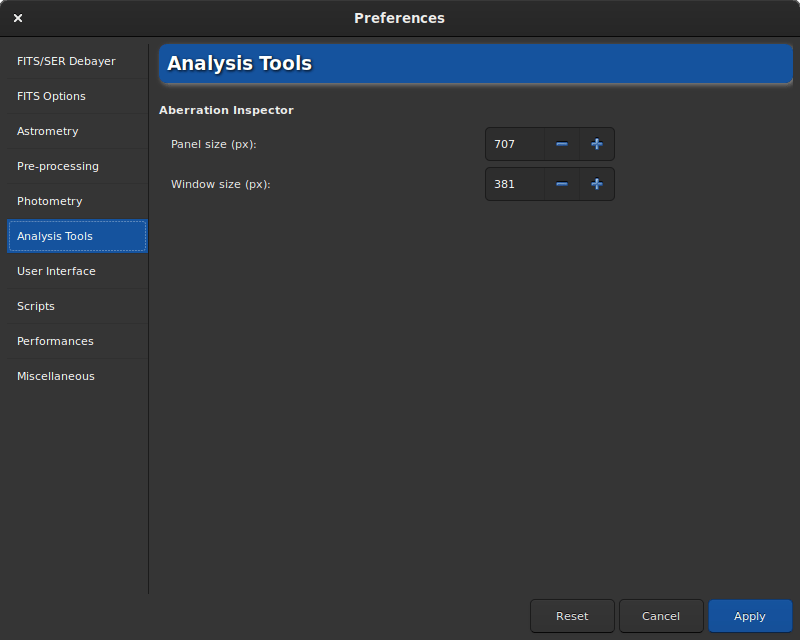
Page 6 of preferences dialog
So far, only one image analysis tool requires adjustment parameters. It is the aberration inspector tool. In this tab you can adjust:
The panel size, in pixels, which defines the size of the image that will be placed in a panel. The larger the value, the larger the size of the image in a panel. A value that is too high may prevent from seeing the defects of the stars.
The window size, also in pixels, which defines the size of the dialog. It is usually a good idea to increase this value when using a 4K screen.
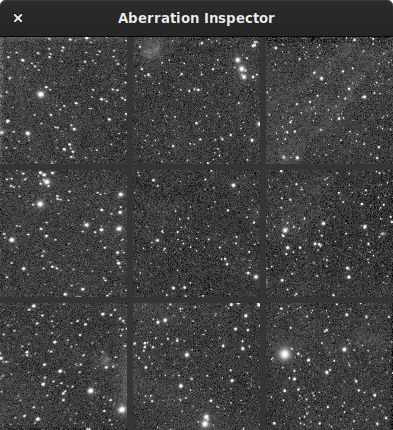
Aberration inspector window
User Interface
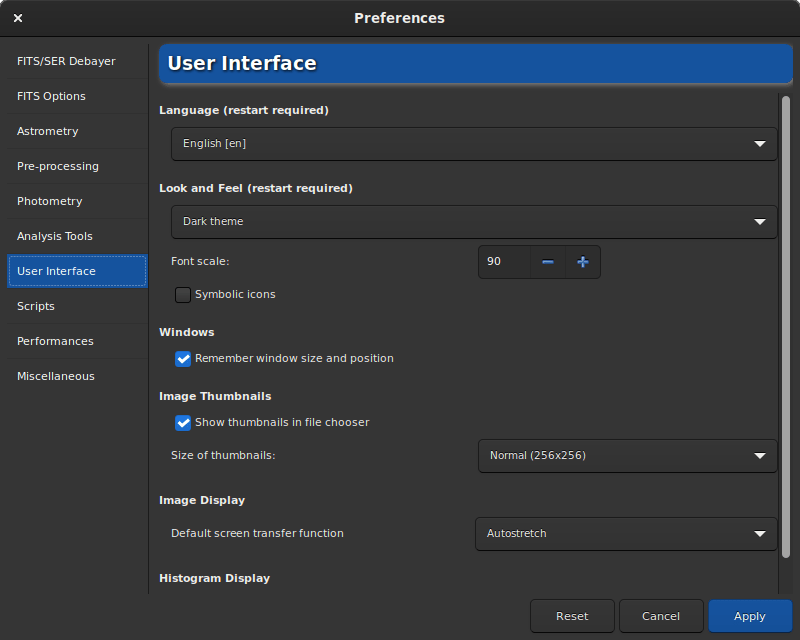
Page 7 of preferences dialog
In this tab are listed all the adjustments related to the user interface. These are not settings that have an impact on the processes, but on the feel and look and needs of the user.
Tip
Don't forget that you can scroll the window as there are options at the bottom.
By default, the language of Siril is defined according to the system language. However it is possible to change the language and define it to your needs, as long as it exists. However, keep in mind that Siril is developed in English.
Two themes are available:
The dark theme (default theme)
The light theme
Changing the theme requires a restart of the application to be fully operational.
It is possible to adjust the font scale for users with a 4K Ultra-HD screen, or to use symbolic icons for some icons. Theses settings also require a restart of the application.
By default Siril remembers the size and the position of the application window each time you close it. By checking on the Remember window size and position button you can disable this behavior.
The thumbnails of the images are usually visible in the open dialog boxes. The preferences allow you to not display them if the computer has limited performance and the user does not see the need. You can also change the size of the thumbnail display with the drop-down list.
Default screen transfer function is the setting that allows images to be displayed according to the user's preference. By default, this is set to Linear. As this really represents what the image is, it is recommended that beginners leave this setting at default. It is easy to forget that you are in auto-adjusted viewing and not understand why the saved images are not as they appear on the screen. However you can always adjust the visualization in the main window.
According to the same principle, the histograms can be displayed in two modes with Default display mode. Either the Linear or the Logarithmic mode. The latter can be very useful with the Generalized Hyperbolic Stretch tool. You can however change the mode in each window with a histogram. In the preferences, this is a matter of setting the default behavior.
Region of Interest is the setting that allows to chose the type of selection you want to apply to the ROI: Manual or Automatic from selection. These options are described in details in the dedicated section Setting the ROI.
Mouse Behaviour provides configuration of mouse behaviour. Since 1.3.0 this allows configuring the behaviour of double middle-click to set a preset zoom level. The preset zoom level can be set either to zoom to fit, zoom to 100% centered on the mouse cursor, or to toggle between zoom to fit and zoom to 100% centered on the mouse cursor. Together with the other improvements to pan and zoom control using the middle mouse button, this improves one-handed operability of Siril.
The Mouse Configuration button opens the mouse configuration dialog. This allows you to completely customise your mouse behaviour for Siril by changing default mouse behaviour or adding or removing mouse functions. This can be particularly useful for disabled users to remap existing mouse functions to other buttons or so that they don't need modifier keys, and it can be useful for any user with a mouse with lots of buttons (or two-way scroll wheels) to assign new actions (such as save, undo, scroll through the active sequence) to mouse buttons or scroll axes in a way that has not previously been possible, or with two-way scroll wheels.
You need to click through a reminder that this tool can remove or change mouse behaviour so that your settings no longer match the documentation. The tool has a certain amount of sanity checking built in (it will reject duplicate assignments, it will insist that the main mouse action used for interacting with the image is included, and it will check for clashes between single click and double click actions assigned to the same button and modifier. If you really mess up your configuration there is a reset button that will reset all mouse behaviour to the defaults.
Mouse button numbering is not always obvious, especially with mice with many buttons, as the scroll wheel directions are accounted for in button numbering, so a scratchpad area is provided to the right of the dialog. If you click any mouse button here, its number will be shown in the label. This is the same number you need to use when assigning functions to that mouse button.

Tip
Note that this configuration applies only to mouse events on the main drawing area (where the image is displayed). Regardless of any mouse actions configured here, the mouse behaviour will still be the same elsewhere in the application. So for example if you want to universally swap left and right mouse buttons, you can't do that here, but you may be able to do so in your Operating System settings or mouse driver config.
You can configure some texts and drawings colors to be displayed on the image in the Colors section. To do so, simply click on the color button and choose the color of your choice. This choice concerns 5 items:
Background extraction samples
Standard annotations
Deep Sky Object annotations
Solar System Object annotations
Temporary Object annotations
Color Management
Working Color Spaces
Preferred Color Space
This option selects the set of working color spaces, namely a linear RGB working space, a nonlinear RGB working space with the color space's standard tone response curve (TRC), and a Gray working space with a TRC matched to the RGB working space. The options are sRGB, which is most suitable for working with images for WWW use; Rec2020, which is Siril's recommended wide gamut color space; and Custom, which allows you to define your own set of profiles using the file choosers.
External Color Profiles
These filechoosers are only of use to gether with the From Files option selected above for your Preferred Color Space.
RGB ICC profile: This file chooser lets you pick the RGB ICC profile for your preferred color space.
Gray ICC profile: This file chooser lets you choose a Gray ICC profile. The profile should have a tone response curve (TRC) matched to that of your chosen RGB color space.
An example of how to set a custom RGB gamut corresponding to Pro Photo RGB is available on the profiles page.
Gamut Visualisation
This button opens a reference image comparing the gamuts offered by the built-in sRGB and Rec2020 color spaces with the gamuts of some other well-known RGB color spaces.
Custom Profiles
Custom monitor profile: This option allows you to choose a custom monitor profile, for example if you have calibrated your monitor or are using a wide gamut monitor. There is also a button to clear the current selection, and a check box to set whether or not the custom monitor profile is active. If it is not active, the display transform will target a standard sRGB display.
Rendering intent: This option allows you to choose your preferred ICC rendering intent, which is used for the color transform from the working space to the monitor profile. A description of the available intents is available on the Theory page. A check button is also provided to set whether or not to use Black Point Compensation.
Output device proofing profile: This option allows you to choose a soft proofing profile for an output device. If no profile is set here, soft proofing will target the display profile. There is also a button to clear the current selection and a check box to set whether or not the soft proofing profile is enabled. If it is not enabled, the soft proofing display mode will not be available.
File Import / Export Options
Treat non color-managed files as sRGB for export to supported formats: This option is for images that do not have a color profile assigned. If the option is checked, when an image without an ICC profile is exported to a format that supports ICC profiles, it will be saved with a sRGB ICC profile or a Gray profile with a TRC that matches the standard sRGB TRC. This is essentially the behaviour of previous versions of Siril. It will often work OK, but does not represent a properly color managed workflow. The option is on by default, but it is better to avoid the issue by using the auto conversion / assignment options to ensure that images will have an ICC profile assigned and be properly color managed at the time you wish to save them.
Export 8-bit images using: This option sets the color space to export 8-bit images that support embedding ICC profiles: the choice is between sRGB and your working color space as chosen with the Working RGB Gamut option above.
Export high bit depth images using: This option sets the color space to export 16-bit images that support embedding ICC profiles: the choice is between sRGB and your working color space as chosen with the Preferred Color Space option above.
Export intent: this sets the intent for transforming images from their assigned color space to the color space they are to be saved in. Leave this set to Relative Colorimetric to ensure your saved images look consistent with how you saved them. Other intents should probably only ever be chosen here for debugging purposes and similar.
One preference is in the FITS Options tab:
Embed ICC profiles in FITS images and FITSEQ sequences: This option enables ICC profile embedding in FITS files: the profiles are embedded within an extra HDU inside the FITS file, with the name "ICCProfile", which matches the embedding method used by other major astrophotography software. It is strongly recommended to leave this option enabled.
Tip
Export of images to 8-bit and 16-bit formats that do not support embedded ICC profiles will always be in the sRGB color space.
Auto Conversion / Assignment Options
Auto assign working color space
This set of check boxes sets the occasions on which an image will automatically be assigned the working color space. The possibilities are: on load, on stacking, on stretching and on the output of compositing tools (pixelmath / RGB composition).
The default is to assign the working color space on stretching, as this is the point at which you typically switch the viewer mode to Linear and start to stretch your image to look the way you want it to. This is when color management starts to matter.
However, you can also assign the color space at earlier stages in processing if you want to. There is little benefit or drawback to doing so in most circumstances, but if you expect to be exporting images before stretching them then selecting the other check boxes will ensure that a color profile is always assigned.
Tip
A color profile will never be automatically assigned if Siril believes it is a single channel extracted from a 3-color image using RGB, HSV, HSL, CIE L*a*b* or Green extraction. There is no ICC profile that can sensibly be assigned in this case. You should consider the file to be raw data until you are ready to either re-composite it with other data or process it to look good in its own right, at which point you should assign your preferred working color space.
Split-out CFA, Ha and OIII channels can safely be assigned a linear version of the working space, and this will be done if the pedantic option described below is active.
If you want to avoid color profiles completely you can select "Never", but this will result in a non-color managed workflow and your images may not look consistent when viewed in other software or when output to different output devices.
Pedantically assign linear ICC profiles
When auto-assigning ICC profiles to:
loaded images that lack an ICC profile and show no evidence of previous stretching,
newly stacked images,
newly composited images
Siril will assign a linear ICC profile. This is usually technically correct, as such images will still contain linear light data. The option is made available should you want it, however it is generally unnecessary: see the profiles page for an explanation of why. You may wish to use this in order to benefit from the display transform by applying your stretches to the original linear data while previewing the effect in sRGB (or your custom monitor profile): in this case you should deselect the following auto-conversion box, so that the profile remains linear during stretching, and then manually convert the data to your working profile on completion of stretching.
Convert other color profiles to the working profile?
This drop-down sets Siril's behaviour if an image is loaded with an ICC profile that is different to the selected working profile. The optons are: Never, Always and Ask every time. The default is Never, as this avoids unrequested change to the image, however for a consistent workflow you may wish to select Always, so that you are always editing in your preferred color space. Ask every time is an option, but it can be annoying especially as it regards the v2 export profiles as being different to the v4 built-in working profiles, so although it is provided for users who wish to manage every detail, it is not particularly recommended.
Built-in Profiles
Export Built-in Profiles
Siril uses profiles from the Elle Stone collection of color profiles to provide its built-in profiles. As these are distributed under a Creative Commons BY-SA-3.0 licence which requires sharing the profiles, a button is provided to export all the built-in profiles to the working directory.
In order to provide a profile capable of the Perceptual sRGB intent, the ICC Preference profile with perceptual lookup tables is provided. To export this you will need to accept the same terms and conditions text as you do to download it from the ICC website.
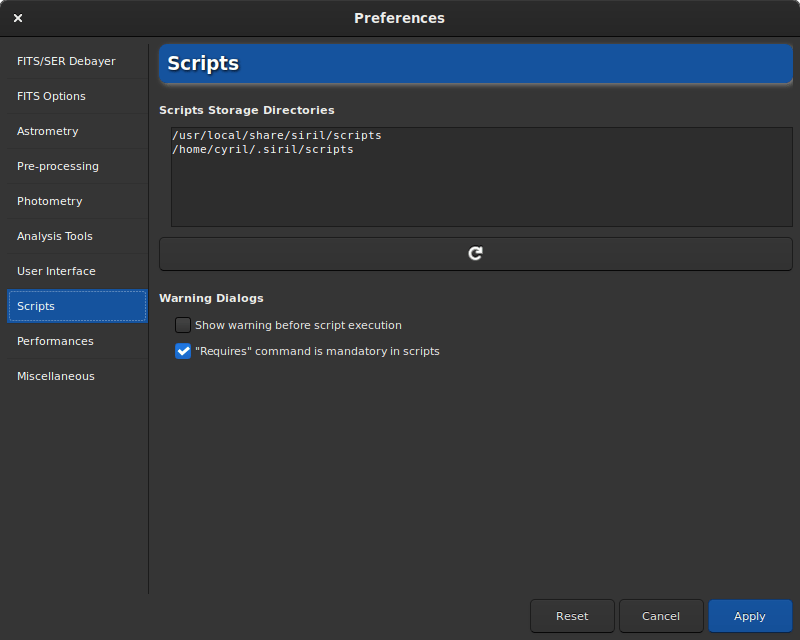
Scripts
Page 8 of preferences dialog
The Scripts tab essentially contains the locations where Siril should look for scripts. Indeed, by default and depending on the OS used, the scripts are installed in a specific place:
/usr/local/share/siril/scriptsor/usr/share/siril/scriptson GNU/Linux.C:\Program Files\Siril\scriptson Windows./Applications/Siril.app/Contents/Resources/share/siril/scriptson MacOS, if the application has been installed in the Applications folder.
Warning
On macOS, as the application is signed and notarized, it is impossible to modify the scripts inside the bundle. Otherwise, the application will not start. So you have to define another path pointing to a folder where you have write permissions.
The Script Storage Directories field allows you to define custom folder paths to place scripts that you have created and/or modified. Clicking on the button just below will rescan the folders and update the list of scripts in the dedicated menu.
The Warning Dialogs section proposes to disable:
The warning text that is displayed before a script is executed.
The check of the keyword
requireswhich must be at the very beginning of the script in order to check if the script is compatible with the version of Siril. We recommend to not uncheck this option.
The Siril Script Repository field is where scripts that have been validated by the Siril team are automatically uploaded. However, these may have been written by third-party developers. You can enable/disable this feature with the Enable use of the siril-scripts online repository button, and define automatic or manual updates with Automatic updates and Manual update. To display a script in the script menu, simply select it.
The Reset python venv will kill all running python scripts and reset the virtual environment "venv" directory to an as-new state. Any modules that have been installed by scripts will require re-installation. This is normally not necessary but is provided as a last resort to restore the venv to a pristine state as an aid to troubleshooting.
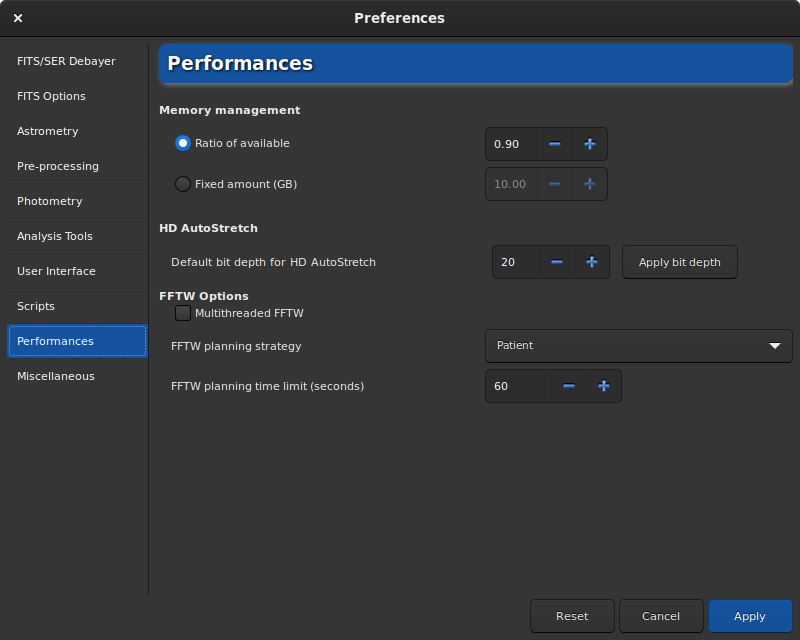
Performances
Page 9 of preferences dialog
Astronomical image processing software, such as Siril, uses a lot of resources and usually requires quite powerful computers. It is not impossible, when the computer is very busy, that it freezes completely. It is not at all recommended to do anything else on the computer during the processing, especially Internet browsing, because browsers are very greedy for RAM. However, it is possible to manage the maximum percentage of RAM that Siril can use.
Ratio of available: Siril will limit itself to a ratio of the amount of free physical memory and will decrease the size of work tasks if needed. A value above 1 means that some memory paged on a configured storage will be used and that the overall process will be slower and the system will likely be unresponsive during some operations. If you don't have paged memory configured on some storage, a value of 1 or above will likely result in a crash of siril or of the operating system.
Fixed amount (GB): Siril will limit itself to a fixed amount of memory and will decrease the size of work tasks if needed. Configuring a memory amount larger than what is available on your system may result in a crash of siril or of the operating system.
The Default bit depth for HD AutoStretch option sets default bit depth for the HD AutoStretch display mode. Higher bit depths require exponentially more memory for the LUT and take longer to recalculate it, but do a much better job of smoothing quantization artefacts in displaying images with very narrow histogram peaks. The default bit depth will apply from the next viewer mode change, and can be applied now using the button to the right. Click on the Apply bit depth button to set the selected HD AutoStretch bit depth now.
Multithreaded FFTW: this toggle button sets FFTW to use multiple threads. This can be faster (though performance does not increase linearly with the number of processors, due to synchronization overhead), but FFTW's planning stage takes longer for multi-threaded systems so particularly the first FFT for a given image size may be considerably slower using multiple threads.
FFTW planning strategy: this combobox sets the FFTW planning strategy. FFTW has multiple algorithms for calculating a FFT and will plan a given FFT to optimize speed. It saves the results of these plans for later reuse in a cache file called "Wisdom", so some extra time spent up-front planning can reap rewards if you calculate a lot of FFTs of the same size. Note that wisdom is specific to a given machine: it should not be shared between machines and should be deleted and regenerated from scratch following a memory or processor upgrade or a major change of software environment (major OS changes, Siril major version changes). In order of speed, Estimate is fastest: this strategy does not actually do any measurement but does planning based on a set of heuristics. Measure is next fastest: this method actually compares the speed of different internal FFTW methods of calculating the FFT and picks the fastest. As a result, the planning step takes longer. Patient considers even more possible plans, and Exhaustive considers even more. If you always process images of a specific size then the more expensive planning strategies may be worthwhile becaues of Wisdom, but if you work with images of lots of different sizes then a cheaper planning algorithm may be more suitable.
FFTW planning time limit: this time limit halts FFTW planning after the specified time limit. This will override the planning strategy. Note that the time limit is not strictly enforced: FFTW will finish any non-interruptible calculation it is performing at the time the limit is reached, and if set to zero FFTW will always as a minimum carry out Estimate planning.
Drizzle: High resolution Drizzle weight files: When this button is toggled, weight files produced by the drizzle algorithm will be of the same bitdepth than the images. This can be important when trying to get the best possible FWHM on the stacked image, but it is very much space consuming. By default, it is unticked and the weight files are saved in 8-bit.
Miscellaneous

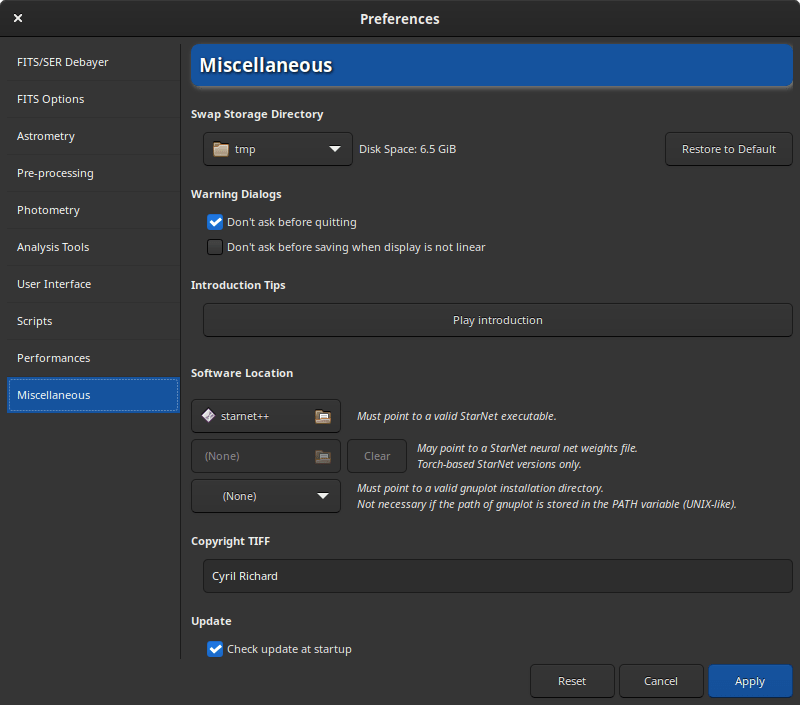
Page 10 of preferences dialog
The last tab contains everything that does not fit in the other themes.
Using the Undo/Redo buttons requires disk space. Lots of space in some cases. The folder containing the swap files (which are the files necessary for the proper functioning of the undo/redo pair) can be defined in the Swap Storage Directory section. The disk space is listed to the right of the file chooser. We advise to not change the default settings unless you have a good reason to do so. As the choice of a good folder is critical, it is possible to return to the default folder by clicking on Restore to Default.
The Warnings Dialogs allows to disable some warning popups that are here to help beginners.
Introduction Tips: At the very first start of Siril, it is possible to see a little animation showing what's new in the application. This animation can be replayed by clicking on Play introduction.
StarNet Executable Location: In order to use StarNet in Siril, it is necessary to tell Siril the path where the StarNet executable is located. For old StarNet++ v1 installations that use separate executables to process mono and RGB files, either can be chosen - Siril will autodetect the other one if both are installed. Note that for these old installations, the original executable names rgb_starnet++ and mono_starnet++ MUST be kept. For all newer single-executable versions of StarNet, Siril will determine the version heuristically and interface with it accordingly.
StarNet Weights Location: New Torch-based versions of StarNet provide the option to provide the location of a neural network weights file: it need not be in the same directory as the executable. This preference can be used to set the location of a weights file to pass to StarNet, and it can be reset using the associated button. Note: this option only works with Torch-based StarNet installations. With older StarNet installations the weights file must be in the same directory as the executable.
Warning
This is the location of the command line version of StarNet that need to be given, not the GUI one.
Warning
On macOS, it can be difficult to find the directory path because Apple does
not make browsing easy for some folders. A trick is to type
Shift + Cmd + g on the open File Chooser Dialog, then
directly enter the installation path, which is usually the one set by
Homebrew. Usually it is /usr/local/bin on intel
computers and /opt/homebrew/bin/ on Apple Silicon versions.
GraXpert Executable Location: In order to use GraXpert in Siril, it is necessary to tell Siril the path where the GraXpert executable is located. If you find any difficulty in getting GraXpert working with Siril, check that it works by itself before submitting a bug report: all Siril does is execute the third party software, so if it doesn't work by itself then it will not work when called from Siril either.
Copyright TIFF: When saving TIFF files it is possible to customize the copyright of the dedicated EXIF metadata.
Update: By default Siril checks updates at startup. You are free to disable this behavior if you don't want the application queries our website.