Main interface
When launching Siril, the main interface opens.
备注
Click anywhere onto the image below to display its functions.

Image area
This area displays the currently loaded image. Click on Red, Green or Blue to switch between the different layers (color images only, a single BW tab is available for mono images).
Right-click on the image to display a contextual menu:

小技巧
When no image is loaded, double-clicking on the image area pops the Open dialog.
Undo
Undoes the most recent operation.
Redo
Redoes the most recently undone operation.
点扩散函数(PSF)
Computes a PSF for the current selection and carries out quick photometry.
PSF for the Sequence
计算当前序列中所有图像的当前选区的 PSF。
Pick a Star
Applies star detection to the current selection. The result is opened in the Dynamic PSF dialog. Note this operation is more lenient than the full image star finder routine as it assumes that you have picked a selection containing a star: it can therefore be used to pick stars that have been missed by the full image star finder function.
Selection
Applies constraints to the selection box.
Crop
Provides an interface to the Crop and Crop & rotate functions.
小技巧
If a CFA image is loaded, the crop will be constrained to a CFA boundary so that the effective CFA pattern is unchanged for future operations. For Bayer CFA patterns this means the crop selection will snap to a multiple of 2x2 and may shift by up to 1 pixel in x and y directions in order to align with the Bayer pattern start. For X-Trans patters the crop selection will snap to a multiple of 6x6 and may shift by up to 5 pixels in each direction.
警告
Rotating a CFA image by arbitrary angles will destroy the CFA pattern: you should progress your workflow to the point where the CFA pattern has been debayered or Bayer drizzled before doing anything that applies rotation or scaling.
ROI
Provides an interface to set or clear the Region of Interest for ROI processing. Note: this menu entry is not available if the ROI mode is set to "Automatic from selection" in the UI preferences tab.
RGB 对齐
Aligns the image RGB channels. This supports a range of registration methods for alignment:
2-pass global star alignment This uses the 2-pass global star alignment routine with COG framing (so the image dimensions are preserved). This algorithm adjusts with 8 degrees of freedom so it can correct for image shift, rotation and skew. This is the recommended algorithm for images containing stars. This algorithm is global and does not require a selection to be made.
KOMBAT alignment This uses the KOMBAT alignment method. It is primarily intended for planetary alignment, but can also work for deep space images. It provides shift registration only, but is fast. This algorithm requires a selection to be made.
One star registration This is an older algorithm that provides shift-only registration based on the movement of a single star. This is very fast but the registration cannot cope with as many degrees of freedom as the 2-pass global star alignment. It may be suitable if you are certain you only need to correct for image shift. This algorithm requires a single star to be selected.
Image pattern alignment This method performs alignment using the image Fourier transforms. It works for deep space and planetary images but provides only shift registration and is quite slow. This algorithm uses a square selection: a selection must be made, and non-square selections will be corrected to be square.
警告
The tool is RGB align. It is not intended for, and will not work for, aligning unaligned LRGB compositions. In order to do this you must either align the layers to be composed before composition, or align using the RGB alignment tool.
打开
Click on these icons (from left to right) to:
open a file
open a recent file
change the working directory
动态叠加
Click on this button to start a 动态叠加 session.
撤销/重做
Use these buttons to undo/redo last actions. This is only available if last action has been done through GUI, not by typing a command.
Image processing
Click on this button to display the Processing menu.
工具
Click on this button to display the Tools menu.
脚本
Click on this button to display and launch the scripts.
Information bar
This bar displays the current version of Siril and the path to the current working directory.
To the right, informationabout available RAM and disk space id also given.
You can change the available number of threads used by Siril using the +/- signs.
保存
These buttons are used to save your results:
save (overwrites) the current image.
save with a different name and/or extension.
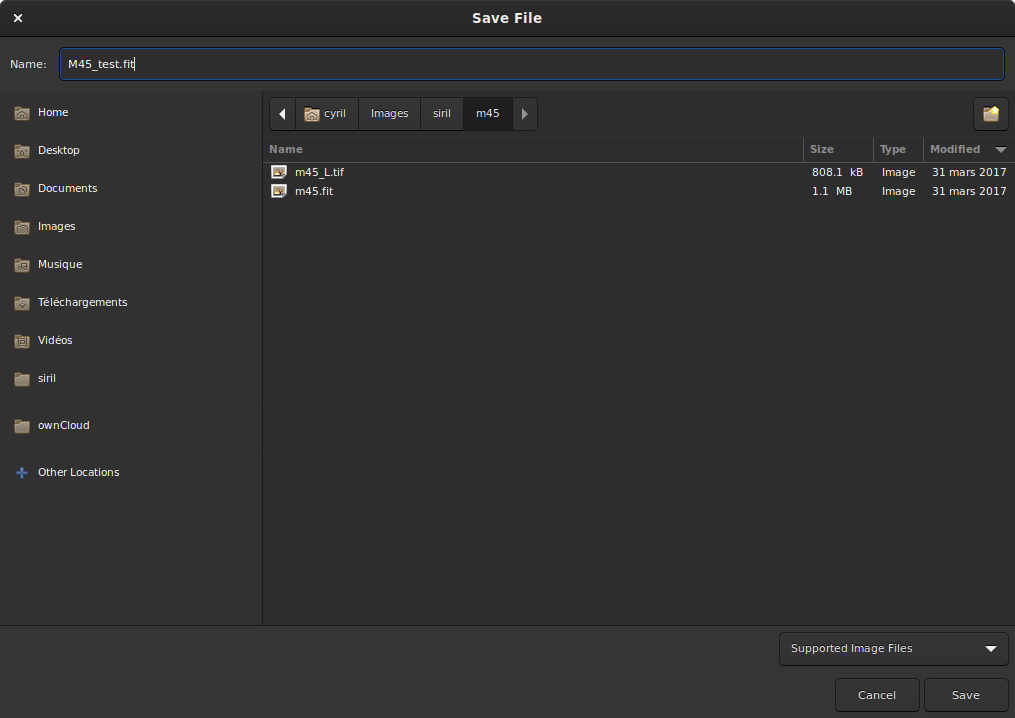
Save dialog box.
The drop-down list at the bottom right allows you to choose the type of image recorded. It automatically adds the extension to the file name. However, by staying in the Supported Image Files mode, it is possible to add any extension supported by Siril by hand and it will save in the correct file format.
take a snapshot of the current view (as seen on the screen, meaning preview strecthing, if any, is applied). There are two possible options. Either the snapshot is saved in the clipboard, or directly copied to the disk in the working directory.
change the bitdepth of the current image. The choice is between 16-bit and 32-bit.
Opens the main menu, also called burger menu. Gives access to Preferences, the documentation and much more.
选项卡
Selects one of the tabs. You can also switch between the different tabs using F1 to F7 shortcuts.
More details can be found there:
选项卡 |
Keys |
|---|---|
F1 |
|
F2 |
|
F3 |
|
F4 |
|
F5 |
|
F6 |
|
控制台 |
F7 |
Tab window
Displays the specifics of the currently selected tab.
Mouse behaviour
Siril uses GTK primary, secondary and middle mouse button mappings. These are usually mapped to left, right and middle (scroll wheel button) physical mouse buttons, however they may be mapped differently in specific setups (e.g. left-handed users may have configured swapped left and right buttons).
Primary mouse button
The primary mouse button is used for a number of purposes:
To select areas of the image
With Ctrl pressed (or Cmd on MacOS), to pan the image
When the intensity profiling tool is active, to drag the line along which the intensity profile is to be drawn, and to select points corresponding to known wavelengths / wavenumbers in the spectroscopy setting
In the RGB composition tool, to select the rotation center when using manual alignment
In the gradient removal tool, to draw samples
In photometry mode, to perform photometry on a star
To select the positions for the registration previews
Double clicking the primary mouse button with no image loaded will bring up the Open dialog.
Secondary mouse button
The secondary mouse button is used for a number of purposes:
To bring up the image context menu (except when in photometry mode)
In the gradient removal tool, to remove samples
In photometry mode, to perform photometry on the selected star for all frames of the currently loaded sequence (if no sequence is loaded, this has no effect)
Middle mouse button
The middle mouse button is used for the following purposes:
To pan the image at the current zoom level
With Ctrl pressed (or Cmd on MacOS), to make a square selection suitably sized for photometry
Double clicking adjusts the zoom level to a preset value. The behaviour is configurable in the User Interface tab in the Preferences dialog. The choices are:
Always zoom to fit
Always zoom to 100% centered on the mouse cursor
Toggle between zoom to fit and zoom to 100% centered on the mouse cursor
Scroll wheel
The scroll wheel is used to adjust the zoom level.
Command line
Type in a command and press Enter.
You can press the button at the end of the line to get some help on the usage.
You can also abort the process being currently executed by clicking on the Stop button.
展开
Click on this bar to expand/retract the whole tab/tab window area.
Image sliders
Use the top and bottom sliders to adjust the white and black points of the previewed image (in Linear mode).
小技巧
Click on the name of the Image or Sequence loaded to copy its name to the clipboard (useful to paste in a command).
Preview mode
Select the preview mode for the loaded image, between the following choices:
线性
对数
Square root
平方
反双曲正弦
Autostretch (tick the High Definition box to use a deeper (up to 24-bit, configurable in Preferences) LUT instead of the default 16-bit one)
直方图
In Autostretch mode with color images, the toggle to the right activates/deactivates channel linking. When unlinked, the 3 layers are stretched independantly so as to give a more balanced image.
警告
This is just a preview of the image, not the actual data (except if Linear mode is selected). Do not forget to stretch your images before saving them.
Special views
Use these toggles to show previewed images:
in inverted colors
in false colors
Astrometry tools
Use these toggles to show:
astrometric annotations
坐标网络
警告
加载的图片必须先被解析。
快速测光
这个开关控制快速测光 :ref:`quick photometry <photometry/quickphotometry:quick photometry>`模式。
Intensity profile
Use this toggle to trigger the intensity profile mode.
缩放
使用这些按钮:
缩小
放大
缩放以适应
缩放至实际大小
小技巧
Ctrl+left clic will allow to navigate into the picture
小技巧
Ctrl+mouse scroll 以缩放 Ctrl + 0 / 1 以缩放至适合/实际大小。
小技巧
Ctrl+Shift and drag with the primary mouse button will measure the distance between two points. If sufficient metadata is available the measurement will be given in degrees, minutes and arcseconds, otherwise it will be given in pixels.
几何变换
使用这些按钮:
逆时针旋转
顺时针旋转
水平镜像
垂直镜像
Frame selection
点击这个按钮打开 frame selector。